Lenovo ThinkServer RS140 (English) User Guide and Hardware Maintenance Manual - Page 77
RemovingtheRAIDcard
 |
View all Lenovo ThinkServer RS140 manuals
Add to My Manuals
Save this manual to your list of manuals |
Page 77 highlights
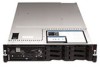
Note: If you want to use the Firmware Updater program, ensure that it is the latest version. To get the latest version of the Firmware Updater program, go to http://www.lenovo.com/drivers, locate the different versions of the program, and then identify the latest version by comparing readme files. If the latest version of the Firmware Updater program does not contain the latest version of the driver you need, download that driver separately from the Web page and install it to your server individually. Removing the RAID card Attention: Do not open your server or attempt any repair before reading and understanding "Safety information" on page iii and "Guidelines" on page 53. Attention: Ensure that you back up your data before removing the RAID card because you might need to reconfigure RAID and reinstall the operating system after removing the RAID card. Before you begin, print all the related instructions or ensure that you can view the PDF version on another computer for reference. Notes: • If you remove the RAID card, you will lose the advanced hardware RAID functions. • The RAID card is sensitive to ESD. Ensure that you read and understand "Handling static-sensitive devices" on page 54 first and carefully perform the operation. • Depending on the specific type, your RAID card might look different from the illustrations in this topic. • Use any documentation that comes with the RAID card and follow those instructions in addition to the instructions in this topic. To remove the RAID card, do the following: 1. Remove all media from the drives and turn off all attached devices and the server. Then, disconnect all power cords from electrical outlets and disconnect all cables that are connected to the server. 2. If the server is installed in a rack cabinet, remove the server from the rack cabinet and place it on a flat, clean, and static-protective surface. 3. Remove the server cover. See "Removing the server cover" on page 55. 4. Remove the screw that secures the RAID card to the riser card assembly. Then, grasp the RAID card by its edges and carefully pull it out of the PCI Express card slot. Note: The RAID card might fit tightly into the PCI Express card slot. If necessary, alternate moving each side of the RAID card a small and equal amount until it is removed from the slot. Figure 36. Removing the RAID card Chapter 6. Installing, removing, or replacing hardware 65
-
 1
1 -
2
-
3
-
4
-
5
-
6
-
7
-
8
-
9
-
10
-
11
-
12
-
13
-
14
-
15
-
16
-
17
-
18
-
19
-
20
-
21
-
22
-
23
-
24
-
25
-
26
-
27
-
28
-
29
-
30
-
31
-
32
-
33
-
34
-
35
-
36
-
37
-
38
-
39
-
40
-
41
-
42
-
43
-
44
-
45
-
46
-
47
-
48
-
49
-
50
-
51
-
52
-
53
-
54
-
55
-
56
-
57
-
58
-
59
-
60
-
61
-
62
-
63
-
64
-
65
-
66
-
67
-
68
-
69
-
70
-
71
-
 72
72 -
 73
73 -
 74
74 -
 75
75 -
 76
76 -
 77
77 -
 78
78 -
 79
79 -
 80
80 -
 81
81 -
 82
82 -
83
-
84
-
85
-
86
-
87
-
88
-
89
-
90
-
91
-
92
-
93
-
94
-
95
-
96
-
97
-
98
-
99
-
100
-
101
-
102
-
103
-
104
-
105
-
106
-
107
-
108
-
109
-
110
-
111
-
112
-
113
-
114
-
115
-
116
-
117
-
118
-
119
-
120
-
121
-
122
-
123
-
124
-
125
-
126
-
127
-
128
-
129
-
130
-
131
-
132
-
133
-
134
-
135
-
136
-
137
-
138
-
139
-
140
-
141
-
142
-
143
-
144
-
145
-
146
 |
 |
