LevelOne FCS-3056 Manual - Page 10
System Installation Check List
 |
View all LevelOne FCS-3056 manuals
Add to My Manuals
Save this manual to your list of manuals |
Page 10 highlights
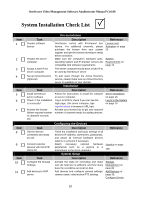
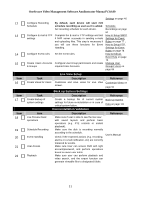
OneSecure Video Management Software Amdinstrator Manual V3.0.09 System Installation Check List Item 1 2 3 4 Item 5 6 7 Item 8 9 Item 10 11 Task Prepare software license Prepare the server computer Assign a fixed IP for server computer Pre-installation Description Reference OneSecure comes with 64-channel free license. For additional channels, please purchase the license from your system supplier and get the license information ready before activation. Make sure the computer's hardware spec, operating system and IE browser version are compatible with software requirements. License and Activation on page 20 System Requirements on page 12 The server computer should have a fixed IP to be used by OneSecure server. Set up Active Directory (Optional) To add users through the Active Directory service, please make sure an Active Directory server is available on your domain. Installation Task Install OneSecure server software Check if the installation is successful Activate the license (When required number of channels exceeds 16) Description Follow the instructions to install the software on server computer. Log in to NVR to check if you can see the login page. (On server computer, type http://localhost in browser's URL bar). Activate your license key to get your required number of channels ready for adding devices. Reference Server Installation on page 16 Log In to the System on page 24 Task Get the devices connected and ready for use Connect external devices with the NVR Client PC Task Configure the Storage Settings Add devices to NVR server Configuring the Devices Description Reference Finish the installation and basic settings of all devices (IP address, usernames, passwords), and attach all external hardware devices (alarms or sensors) if necessary. Attach necessary external hardware peripherals such as a joystick or a microphone to the client computer. System Setup Joystick on page 108 Description Reference Activate the disks for recordings and make sure the total size is sufficient, and how many days the recordings are kept on disk. Add devices and configure camera settings: camera name, video/motion/PTZ settings. Storage Management on page 83 Add Devices on page 35; Configure Device 10
-
 1
1 -
2
-
3
-
4
-
 5
5 -
 6
6 -
 7
7 -
 8
8 -
 9
9 -
 10
10 -
 11
11 -
 12
12 -
 13
13 -
 14
14 -
 15
15 -
16
-
17
-
18
-
19
-
20
-
21
-
22
-
23
-
24
-
25
-
26
-
27
-
28
-
29
-
30
-
31
-
32
-
33
-
34
-
35
-
36
-
37
-
38
-
39
-
40
-
41
-
42
-
43
-
44
-
45
-
46
-
47
-
48
-
49
-
50
-
51
-
52
-
53
-
54
-
55
-
56
-
57
-
58
-
59
-
60
-
61
-
62
-
63
-
64
-
65
-
66
-
67
-
68
-
69
-
70
-
71
-
72
-
73
-
74
-
75
-
76
-
77
-
78
-
79
-
80
-
81
-
82
-
83
-
84
-
85
-
86
-
87
-
88
-
89
-
90
-
91
-
92
-
93
-
94
-
95
-
96
-
97
-
98
-
99
-
100
-
101
-
102
-
103
-
104
-
105
-
106
-
107
-
108
-
109
-
110
-
111
-
112
-
113
-
114
-
115
-
116
-
117
-
118
-
119
-
120
-
121
 |
 |
