LevelOne GEL-2461 Manual - Page 14
Connecting the Power
 |
View all LevelOne GEL-2461 manuals
Add to My Manuals
Save this manual to your list of manuals |
Page 14 highlights
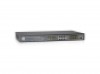
2.4 Connecting the Power Chapter 2 Hardware Installation The GEL-2461 Switch will work with AC power in the range 100-240V AC, 50-60Hz. To prevent the Switch from working abnormally or being damaged, make sure that the power supply and connectivity are normal, and the power outlet is grounded properly before powering on the Switch. The GEL-2461 Switch does not have an on/off switch. To supply power to the Switch, follow these steps: Step 1 Connect one end of the power cord to the power connector on the rear panel of the Switch. Then plug the other end of the power cord to a grounded three-prong AC power outlet. Step 2 Verify that the power LED (PWR) is lit, indicating that the Switch is powered on. If not, check to make sure that the power cord is correctly plugged in and the power outlet is good. After the Switch is powered on, it will enter the self-test phase. During this phase, you can verify that the Switch starts up properly and the network connections are operational by checking the LED states, as described in Table 1-2. http://www.level1.com Page 7
-
 1
1 -
2
-
3
-
4
-
5
-
6
-
7
-
8
-
 9
9 -
 10
10 -
 11
11 -
 12
12 -
 13
13 -
 14
14 -
 15
15 -
 16
16 -
 17
17 -
 18
18 -
 19
19 -
20
-
21
-
22
-
23
-
24
-
25
-
26
-
27
-
28
-
29
-
30
-
31
-
32
-
33
-
34
-
35
-
36
-
37
-
38
-
39
-
40
-
41
-
42
-
43
-
44
-
45
-
46
-
47
-
48
-
49
-
50
-
51
-
52
-
53
-
54
-
55
-
56
-
57
-
58
-
59
-
60
-
61
-
62
-
63
-
64
-
65
-
66
-
67
-
68
-
69
-
70
-
71
-
72
 |
 |
