LevelOne KVM-0831 Manual - Page 14
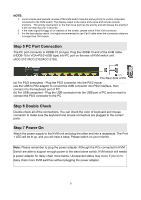
Step 5 PC Port Connection, Step 6 Double Check, Step 7 Power
 |
View all LevelOne KVM-0831 manuals
Add to My Manuals
Save this manual to your list of manuals |
Page 14 highlights
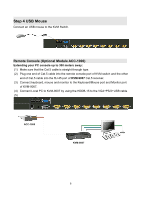
NOTE: 1. Local console and Remote console of the KVM switch have the same priority to control computers connected to the KVM switch. The display output is the same at the local and remote console monitors. The priority mechanism is: the first move port has the priority and will release the priority if it did not keep input for 2 seconds. 2. If the video signal is foggy or un-cleared on the screen, please check if the VGA connector 3. For the best display result, it is highly recommended to use Cat.6 cable when the connection distance is longer than 150 meters. Step 5 PC Port Connection The PC port connector is HDDB-15 pin type. Plug the HDDB-15 end of the KVM cable (HDDB-15 to VGA+PS/2+USB type) into PC port on the rear of KVM switch unit. (ACC-2101/ACC-2102/ACC-2103). The Rear Side of PC (a) For PS/2 computers - Plug the PS/2 connector into the PS/2 mouse port of PC. And to use the USB to PS2 adaptor to convert the USB connector into PS/2 interface, then connect it to the keyboard port of PC. (b) For USB computers - Plug the USB connector into the USB port of PC and no need to connect the PS/2 connector to the PC. Step 6 Double Check Double-check all of the connections. You can check the color of keyboard and mouse connector to make sure the keyboard and mouse connectors are plugged to the correct ports. Step 7 Power On Attach the power supply to the KVM unit and plug the other end into a receptacle. The Port 1 LED will be lit up, and you will hear a beep. Please switch on your monitor. Note: Please remember to plug the power adapter. Although the PCs connected to KVM Switch are able to support enough power to the stand alone switch, KVM switch still needs a power adapter for daisy chain more banks. Unexpected status may occur If you try to daisy chain more KVM switches without plugging the power adapter. 9
-
 1
1 -
2
-
3
-
4
-
5
-
6
-
7
-
8
-
 9
9 -
 10
10 -
 11
11 -
 12
12 -
 13
13 -
 14
14 -
 15
15 -
 16
16 -
 17
17 -
 18
18 -
 19
19 -
20
-
21
-
22
-
23
-
24
-
25
-
26
-
27
-
28
-
29
-
30
-
31
 |
 |
