Lexmark 17S0026 Setup Guide - Page 37
Mac OS X version 10.1.2 and later
 |
UPC - 734646080262
View all Lexmark 17S0026 manuals
Add to My Manuals
Save this manual to your list of manuals |
Page 37 highlights
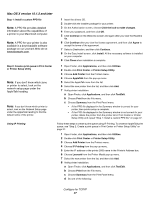
Mac OS X version 10.1.2 and later Step 1: Install a custom PPD file Note: A PPD file provides detailed information about the capabilities of a printer to your Macintosh computer. Note: A PPD for your printer is also available in a downloadable software package on our Lexmark Web site at www.lexmark.com. Step 2: Create a print queue in Print Center or Printer Setup Utility Note: If you don't know which zone or printer to select, look on the network setup page under the AppleTalk heading. Note: If you don't know which printer to select, look on the Network Setup page under the AppleTalk heading to find the default name of the printer. Using IP Printing 1 Insert the drivers CD. 2 Double-click the installer package for your printer. 3 On the Authorization screen, choose Click the lock to make changes. 4 Enter your password, and then click OK. 5 Click Continue on the Welcome screen and again after you view the Readme file. 6 Click Continue after you view the license agreement, and then click Agree to accept the terms of the agreement. 7 Select a Destination, and then click Continue. 8 On the Easy Install screen, click Install. All the necessary software is installed on your computer. 9 Click Close when installation is complete. 1 Open Finder, click Applications, and then click Utilities. 2 Double-click Print Center or Printer Setup Utility. 3 Choose Add Printer from the Printers menu. 4 Choose AppleTalk from the pop-up menu. 5 Select the AppleTalk zone from the list. 6 Select the new printer from the list, and then click Add. 7 Verify printer installation: a Open Finder, click Applications, and then click TextEdit. b Choose Print from the File menu. c Choose Summary from the Print Panel menu. • If the PPD file displayed in the Summary window is correct for your printer, then printer setup is complete. • If the PPD file displayed in the Summary window is not correct for your printer, delete the printer from the printer list in Print Center or Printer Setup Utility and repeat "Step 1: Install a custom PPD file" on page 37. Follow these steps to create a print queue using IP Printing. To create an AppleTalk print queue, see "Step 2: Create a print queue in Print Center or Printer Setup Utility" on page 37. 1 Open Finder, click Applications, and then click Utilities. 2 Double-click Print Center or Printer Setup Utility. 3 Choose Add Printer from the Printers menu. 4 Choose IP Printing from the pop-up menu. 5 Enter the IP address or the printer DNS name in the Printer's Address box. 6 Choose Lexmark from the Printer Model pop-up menu. 7 Select the new printer from the list, and then click Add. 8 Verify printer installation: a Open Finder, click Applications, and then click TextEdit. b Choose Print from the File menu. c Choose Summary from the Print Panel menu. d Do one of the following: Configure for TCP/IP 37
-
 1
1 -
2
-
3
-
4
-
5
-
6
-
7
-
8
-
9
-
10
-
11
-
12
-
13
-
14
-
15
-
16
-
17
-
18
-
19
-
20
-
21
-
22
-
23
-
24
-
25
-
26
-
27
-
28
-
29
-
30
-
31
-
 32
32 -
 33
33 -
 34
34 -
 35
35 -
 36
36 -
 37
37 -
 38
38 -
 39
39
 |
 |