Lexmark 2050 Color Jetprinter Setup Guide - Page 2
Use the printer software, Open the Online Guide - inks
 |
View all Lexmark 2050 Color Jetprinter manuals
Add to My Manuals
Save this manual to your list of manuals |
Page 2 highlights
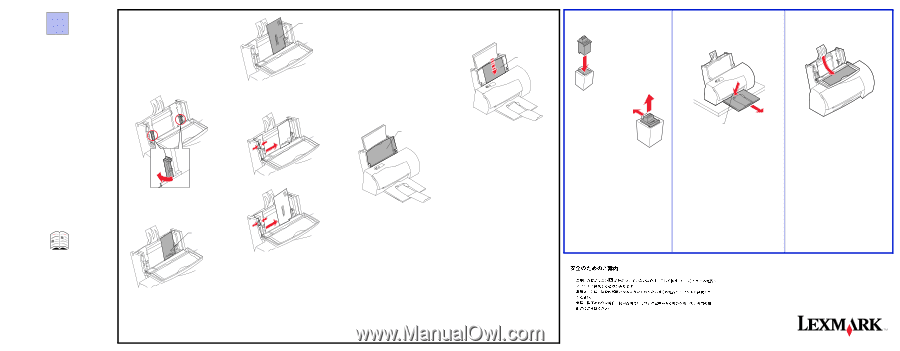
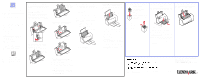
8 Use the printer software You can use the Lexmark 2050 Series printer software to: • change printer settings • install and align print cartridges • monitor print jobs and print cartridge ink levels • control jobs in the print queue • choose different sizes and types of paper • print from Windows or DOS applications • reset printer defaults Open the Online Guide In the Online Guide, you can find information about: • using the printer software • loading different types of print media • ordering supplies • using the manual feeder • who to call if you need help • VCCI notice Windows 3.1 or Windows for Workgroups From the Lexmark 2050 program group, double-click the Online Guide icon: Loading other print media To load Hagaki, envelopes, greeting cards, or index cards in the sheet feeder, follow these steps: 1 Open the paper load door and remove any paper in the sheet feeder. 2 Turn both left and right envelope guides inward to the envelope load position. Press on the envelope symbol area to rotate the guides inward until they snap into position. 3 Place the Hagaki, envelopes, greeting cards, or index cards in the sheet feeder behind the envelope guides. Place the preferred print side facing you. Top of Hagaki card Address added to show correct orientation 4 Squeeze and hold the left paper guide release lever and slide the paper guide against the left side of the media. Loading the manual feeder You can print from the manual feeder without removing paper or envelopes from the sheet feeder. The manual feeder allows you to print one sheet at a time. Before loading the manual feeder, make sure Manual Feeder is selected as the paper source in the Lexmark 2050 printer software. See "How to choose the Manual or Automatic feeder" in the Online Guide for more information. To feed paper, transparencies, Hagaki, envelopes, or other media one at a time: 1 Locate the manual feeder. Manual feeder 2 Send the job to print. 3 When prompted by the printer software, insert the print media into the manual feeder until the printer automatically loads it. Print media • Place the preferred print side facing you. • Insert the paper or other media against the right edge of the manual feeder slot. • Insert Hagaki so the top of the card enters the printer first. • Insert letterhead with the top of the page pointed down. • When loading transparencies with a paper backing, load with the glued edge pointing down. • Remove each transparency or glossy paper from the paper exit tray before the next one is printed to avoid ink smearing. Using the print cartridge storage unit You can use the print cartridge storage unit for open cartridges not currently installed in the printer. Insert the extra cartridge into the storage unit until it snaps into place. Removing the paper exit tray If you need to repack the printer in its original box, you must remove the paper exit tray. Storing the setup sheet Store this setup sheet in the bookholder behind the printer's paper load door. To remove the print cartridge, firmly pull it out of the storage unit while slightly pulling back on the latch. Press down firmly here 1 Place the printer near the table edge. 2 Pull the paper exit tray as far out of the printer as possible. The tray should extend beyond the table edge. 3 Press down firmly in the center of the tray at the point where the tray enters the printer. 4 Pull the paper exit tray all the way out of the printer. Windows 95 1 From the Start menu, click Programs. 2 Click the Lexmark 2050 program group. 3 Click Online Guide. Note: Return the envelope guides to their original position when not printing Hagaki, envelopes or other special media. 5 Close the paper load door. 6 Before sending a job to print, make sure you choose the appropriate paper size and paper type in the Lexmark 2050 printer software. For more information, see "How to choose a media type" and "How to choose a paper size" in the Online Guide. Lexmark is a trademark of Lexmark International, Inc., registered in the United States and/or other countries. Color Jetprinter is a trademark of Lexmark International, Inc. Other trademarks are the property of their respective owners. © Copyright 1996 Lexmark International, Inc. Lexington, KY 40511-1876 USA • This product is designed, tested, and approved to meet strict global safety standards with the use of specific Lexmark components. The safety features of some parts may not always be obvious. Lexmark is not responsible for the use of other replacement parts.
-
 1
1 -
 2
2
 |
 |