Lexmark 21Z0300 Maintenance Manual - Page 15
Replacing a photoconductor, Replace black pc unit
 |
UPC - 734646048965
View all Lexmark 21Z0300 manuals
Add to My Manuals
Save this manual to your list of manuals |
Page 15 highlights
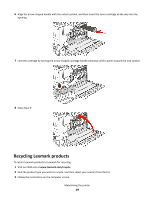
Replacing a photoconductor Replace the black photoconductor when 84 Replace black pc unit appears. Replace the cyan, magenta, and yellow photoconductors when 84 Replace color pc units appears. 1 Open Door E (front printer door). Warning-Potential Damage: To avoid overexposing the photoconductors, do not leave the door open for more than 10 minutes. 2 Release the bar by pressing the E5 button located on the bottom of the E5 latch, lift the E5 latch, and then press the bar down. 3 Remove the photoconductor(s) specified on the display. Photoconductor color Opening name Black E1 Cyan E2 Magenta E3 Yellow E4 Maintaining the printer 15
-
 1
1 -
2
-
3
-
4
-
5
-
6
-
7
-
8
-
9
-
 10
10 -
 11
11 -
 12
12 -
 13
13 -
 14
14 -
 15
15 -
 16
16 -
 17
17 -
 18
18 -
 19
19 -
 20
20 -
21
 |
 |

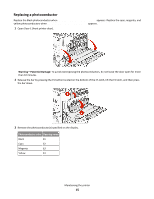
Replacing a photoconductor
Replace the black photoconductor when
84 Replace black pc unit
appears. Replace the cyan, magenta, and
yellow photoconductors when
84 Replace color pc units
appears.
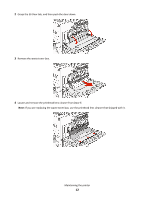
1
Open Door E (front printer door).
Warning—Potential Damage:
To avoid overexposing the photoconductors, do not leave the door open for more
than 10 minutes.
2
Release the bar by pressing the E5 button located on the bottom of the E5 latch, lift the E5 latch, and then press
the bar down.
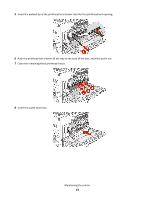
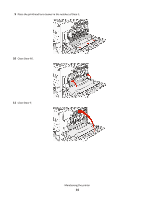
3
Remove the photoconductor(s) specified on the display.
Photoconductor color
Opening name
Black
E1
Cyan
E2
Magenta
E3
Yellow
E4
Maintaining the printer
15