Lexmark 510n User's Reference - Page 77
Setting the operator panel when a supply is replaced, Changing the toner cartridge yield
 |
View all Lexmark 510n manuals
Add to My Manuals
Save this manual to your list of manuals |
Page 77 highlights
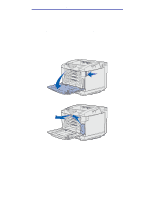
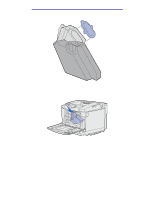
Maintenance Setting the operator panel when a supply is replaced If you plan to replace a toner cartridge and the toner cartridge you are replacing has a different part number, you must change the toner cartridge yield setting before installing the toner cartridge. Changing this setting is necessary to maintain the accuracy of the counter in showing the remaining toner. See Changing the toner cartridge yield for instructions. When you replace a supply item, you must specify which item was replaced. See Specifying the replaced supply for instructions. Changing the toner cartridge yield Change the yield setting before you install the toner cartridge. 1 Make sure the printer is on and the Ready message appears. 2 Press and release Menu until you see Config Menu, and then press Select. 3 Press and release Menu until you see Cartridge Yield, and then press Select. 4 Press and release Menu until you see the color name of the toner cartridge you need to replace. The selections are Cyan, Magenta, Yellow, and Black. Press Select. 5 Press and release Menu until you see the type of the toner cartridge you need to replace. The selections are Standard Yield and High Yield. Press Select. 6 Press Menu until you see Exit Config Menus, and then press Select. The change to the yield setting takes effect once you exit the Config Menu. 7 Install the toner cartridge. See Replacing the toner cartridges for instructions. 8 Specify the item you replaced. See Specifying the replaced supply for instructions. Specifying the replaced supply Note: If you replace the fuser or photodeveloper cartridge once the printer issues the 87 Fuser Life Warning or 83 Photodev Cart Life Warning messages, respectively, the printer issues message prompts on the operator panel for you to follow. You need to follow those printer message prompts instead of completing the following instructions. Once you have replaced a toner cartridge, a fuser, or a photodeveloper cartridge, complete the following: 1 Make sure the printer is on and the Ready message appears. 2 Press and release Menu until you see Supplies Menu, and then press Select. 3 Press and release Menu until you see Replace Supplies, and then press Select. Setting the operator panel when a supply is replaced 77
-
 1
1 -
2
-
3
-
4
-
5
-
6
-
7
-
8
-
9
-
10
-
11
-
12
-
13
-
14
-
15
-
16
-
17
-
18
-
19
-
20
-
21
-
22
-
23
-
24
-
25
-
26
-
27
-
28
-
29
-
30
-
31
-
32
-
33
-
34
-
35
-
36
-
37
-
38
-
39
-
40
-
41
-
42
-
43
-
44
-
45
-
46
-
47
-
48
-
49
-
50
-
51
-
52
-
53
-
54
-
55
-
56
-
57
-
58
-
59
-
60
-
61
-
62
-
63
-
64
-
65
-
66
-
67
-
68
-
69
-
70
-
71
-
 72
72 -
 73
73 -
 74
74 -
 75
75 -
 76
76 -
 77
77 -
 78
78 -
 79
79 -
 80
80 -
 81
81 -
 82
82 -
83
-
84
-
85
-
86
-
87
-
88
-
89
-
90
-
91
-
92
-
93
-
94
-
95
-
96
-
97
-
98
-
99
-
100
-
101
-
102
-
103
-
104
-
105
-
106
-
107
-
108
-
109
-
110
-
111
-
112
-
113
-
114
-
115
-
116
-
117
-
118
-
119
-
120
-
121
-
122
-
123
-
124
-
125
-
126
-
127
-
128
-
129
-
130
-
131
-
132
-
133
-
134
-
135
-
136
-
137
-
138
-
139
-
140
-
141
-
142
-
143
-
144
-
145
-
146
-
147
-
148
-
149
-
150
-
151
-
152
-
153
-
154
-
155
-
156
-
157
-
158
-
159
-
160
-
161
-
162
-
163
-
164
-
165
-
166
-
167
-
168
-
169
-
170
-
171
-
172
-
173
-
174
-
175
-
176
-
177
-
178
-
179
-
180
-
181
-
182
-
183
-
184
-
185
-
186
-
187
-
188
-
189
-
190
-
191
-
192
-
193
-
194
-
195
-
196
-
197
-
198
 |
 |
