Lexmark C524 User's Guide - Page 99
Solving media feed problems, Paper Jam
 |
View all Lexmark C524 manuals
Add to My Manuals
Save this manual to your list of manuals |
Page 99 highlights
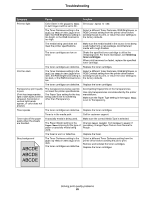
Troubleshooting Solving media feed problems Symptom Paper frequently jams. The Paper Jam message remains after the jam is removed. Cause Solution Media that does not meet the printer specifications is being used. Use recommended media. See the Card Stock & Label Guide available on our Lexmark Web site at www.lexmark.com for detailed specifications. See Clearing jams for more information. See Avoiding jams hints for information that can help prevent jams from occurring. Too much paper or too many envelopes are loaded. Make sure the stack of media loaded does not exceed the maximum stack height indicated by the load line on the tray or the stack height limiter on the multipurpose feeder. Guides in the selected tray are not set to the appropriate position for the size paper loaded. Move the guides in the tray to the correct position. See Loading the standard tray and Loading the optional 500-sheet tray for detailed instructions. The paper has absorbed moisture due to high humidity. Load paper from a fresh package. Store paper in its original wrapper until it is loaded. See Storing media for more information. Some printer models do not have a Remove media from the standard bin. standard bin full sensor. The standard bin media stop is not Set the media stop in the standard bin to the correct set to the correct position for the position. See Using the media stop for more media size. information. The multipurpose feeder door is designed to tilt down to prevent damage to it when the lower door is opened. This is a protective feature of the printer. To reposition the multipurpose feeder door: 1 Remove media from the multipurpose feeder. 2 Push the extensions back into place. 3 Close the multipurpose feeder. 4 Open the multipurpose feeder. 5 Grasp the multipurpose feeder extension, and pull it straight out until fully extended. 6 Load media into the multipurpose feeder. The fuser may be installed incorrectly. CAUTION: The fuser and the inside of the printer near the fuser may be hot. Wait for the fuser to cool before attempting to solve this problem. 1 Turn the printer off. 2 Open the upper door. 3 Push down on the fuser handles while tightening each fuser thumbscrew. 4 Close the upper door completely. 5 Open the upper door completely. 6 Re-tighten each fuser thumbscrew completely. 7 Close the upper door completely. 8 Turn the printer on. The fuser may be damaged. Replace the fuser. The entire media path is not cleared, or the door specified by the message has not been opened to check for jams in this area. Clear media from the entire path, open the door indicated by the operator panel message, clear the jam, and close the door. The printer resumes printing. See Identifying the media path for more information. Solving media feed problems 99
-
 1
1 -
2
-
3
-
4
-
5
-
6
-
7
-
8
-
9
-
10
-
11
-
12
-
13
-
14
-
15
-
16
-
17
-
18
-
19
-
20
-
21
-
22
-
23
-
24
-
25
-
26
-
27
-
28
-
29
-
30
-
31
-
32
-
33
-
34
-
35
-
36
-
37
-
38
-
39
-
40
-
41
-
42
-
43
-
44
-
45
-
46
-
47
-
48
-
49
-
50
-
51
-
52
-
53
-
54
-
55
-
56
-
57
-
58
-
59
-
60
-
61
-
62
-
63
-
64
-
65
-
66
-
67
-
68
-
69
-
70
-
71
-
72
-
73
-
74
-
75
-
76
-
77
-
78
-
79
-
80
-
81
-
82
-
83
-
84
-
85
-
86
-
87
-
88
-
89
-
90
-
91
-
92
-
93
-
 94
94 -
 95
95 -
 96
96 -
 97
97 -
 98
98 -
 99
99 -
 100
100 -
 101
101 -
 102
102 -
 103
103 -
 104
104 -
105
-
106
-
107
-
108
-
109
-
110
-
111
-
112
-
113
-
114
-
115
-
116
-
117
-
118
-
119
-
120
-
121
-
122
-
123
-
124
-
125
-
126
-
127
-
128
-
129
-
130
-
131
-
132
-
133
-
134
-
135
-
136
-
137
-
138
-
139
-
140
-
141
-
142
-
143
-
144
-
145
-
146
 |
 |
