Lexmark C752 Optional Envelope Drawer Sheet
Lexmark C752 Manual
 |
View all Lexmark C752 manuals
Add to My Manuals
Save this manual to your list of manuals |
Lexmark C752 manual content summary:
- Lexmark C752 | Optional Envelope Drawer Sheet - Page 1
on the envelope drawer. b Hand-tighten the screws. Even when fully inserted, the screws allow some space between the drawers. 5 Finish setting up the duplex unit, the printer, and optional mailbox or output expander as instructed in the printer Setup Guide. - Lexmark C752 | Optional Envelope Drawer Sheet - Page 2
could damage the tray or the printer. print side down, with the flap towards the back of the tray. 1 Remove the tray. Envelopes with pull-off strips may have trouble being fed into Note: The envelope tray does not support automatic size sensing. You will the printer. If so, load them with need - Lexmark C752 | Optional Envelope Drawer Sheet - Page 3
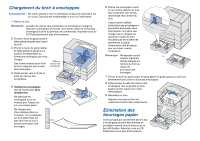
DL • C5 • B5 • Autre (Le format varie de 98,4 x 62 mm à 176 x 250 mm [3,87 x 6,38 po. à 6,93 x 9,84 po.]) Désassemblage de l'imprimante et des options Si l'imprimante et ses options sont déjà installé ou du réceptacle supplémentaire, reportez-vous au Guide d'installation de l'imprimante. - Lexmark C752 | Optional Envelope Drawer Sheet - Page 4
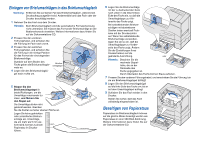
la ou hauteur maximale de pile indiquée sur l'arrière du tiroir au risque de provoquer des bourrages. 7 Pincez le levier du guide avant et faites glisser le guide jusqu'à ce qu'il soit fermement calé contre le bord des enveloppes. 8 Faites pivoter la patte de retenue des enveloppes vers la - Lexmark C752 | Optional Envelope Drawer Sheet - Page 5
Optionales Briefumschlagfach Das Briefumschlagfach faßt bis zu 60 Briefumschläge (75 g/m2). Die folgenden Briefumschlagformate werden unterstützt: • 7¾ •9 • 10 • DL • C5 • B5 • Andere Formate (Größe jeweils zwischen 98,4 x 62 mm und 176 x 250 mm) Auseinanderbauen des Druckers und der Optionen - Lexmark C752 | Optional Envelope Drawer Sheet - Page 6
Einlegen von Briefumschlägen in das Briefumschlagfach Warnung: Entfernen Sie auf keinen Fall das Briefumschlagfach, während ein Druckauftrag ausgeführt wird. Anderenfalls kann das Fach oder der Drucker beschädigt werden. 1 Nehmen Sie das Fach aus dem Drucker. Hinweis: Beim Briefumschlagfach wird - Lexmark C752 | Optional Envelope Drawer Sheet - Page 7
supportate le seguenti dimensioni delle buste: • 7¾ •9 • 10 • DL • C5 • B5 • Altre Le dimensioni possono variare da 98,4 x 62 mm a 176 x 250 mm (da 3,87 x 6,38 tutte le opzioni di uscita dalla parte superiore della stampante. 4 Estrarre la e pulita. 5 Rimuovere l'unità fronte/retro e gli eventuali - Lexmark C752 | Optional Envelope Drawer Sheet - Page 8
a strappo non vengano prelevate correttamente dal vassoio. In questo caso, inserirle con l'aletta rivolta verso la parte anteriore del vassoio. Accertarsi di modificare le impostazioni nel driver della stampante in modo da indicare che l'orientamento è stato invertito. oppure Nota: Non superare il - Lexmark C752 | Optional Envelope Drawer Sheet - Page 9
176 x 250 mm (de 3,87 x 6,38 pulg. a 6,93 x 9,84 pulg.). Desmontaje de la impresora y las opciones Si la impresora y sus opciones ya están instaladas, debe haber en la parte superior de la impresora. 4 Pida ayuda para separar la impresora de las opciones. PRECAUCIÓN: la impresora pesa 47,7 - Lexmark C752 | Optional Envelope Drawer Sheet - Page 10
frontal de la bandeja. Asegúrese de que cambia los valores en el controlador de la impresora para indicar que ha invertido la orientación. Nota: no exceda la altura o de pila máxima indicada en la parte posterior de la bandeja. Si lo hace, puede provocar atascos en la bandeja. 7 Presione la - Lexmark C752 | Optional Envelope Drawer Sheet - Page 11
Outro (o tamanho pode variar de 98,4 x 62 mm até 176 x 250 mm [3,87 x 6,38 in. até 6,93 x 9,84 in.]) Desmontando a impressora e os opcionais Se a impressora e , mas não ambas. 3 Se estiver instalando a gaveta para envelopes na parte superior de uma gaveta para 500 folhas ou de uma gaveta para 2.000 - Lexmark C752 | Optional Envelope Drawer Sheet - Page 12
problemas de alimentação na impressora. Se isto ocorrer, carregue-os com a aba voltada na direção da parte frontal da bandeja. Certifique-se de alterar as configurações em seu driver de impressora para indicar que você inverteu a orientação. Observação: Não exceda a ou altura máxima da pilha - Lexmark C752 | Optional Envelope Drawer Sheet - Page 13
60 75 g/m2 [20 • 7 DL 信封 • 9 C5 信封 • 10 B5 信封 98.4 x 62 公釐到 176 x 250 公釐 [3.87 x 6.38 英吋到 6.93 x 9.84 英吋 ]) 1 2 3 4 47.7 公斤 (105 5 500 1 2 2000 2000 500 2000 500 3 500 2000 a b 4 2000 a b 5 - Lexmark C752 | Optional Envelope Drawer Sheet - Page 14
6 1 2 3 7 4 或 信封壓環 5 5 公釐 (0.2 5 公釐 8 9 清除夾紙 500 - Lexmark C752 | Optional Envelope Drawer Sheet - Page 15
60 75 20 • 7¾ •9 • 10 • DL • C5 • B5 98.4 x 62 毫米至 176 x 250 毫米 [3.87 x 6.38 英寸至 6.93 x 9.84 英寸 ]) 1 2 3 4 47.7 千克 (105 5 500 1 2 2000 2000 500 2000 500 3 500 2000 a b 4 2000 a b 5 - Lexmark C752 | Optional Envelope Drawer Sheet - Page 16
1 6 CD。 2 3 或 的尺寸。 7 4 堆。 8 5 9 清除卡纸 5 毫米 (0.2 5 毫米 500 CD。
-
 1
1 -
 2
2 -
 3
3 -
 4
4 -
 5
5 -
 6
6 -
 7
7 -
8
-
9
-
10
-
11
-
12
-
13
-
14
-
15
-
16
 |
 |
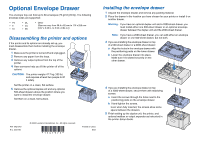
Optional Envelope Drawer
The envelope tray can hold up to 60 envelopes (75 g/m2 [20 lb]). T
he following
envelope sizes are supported:
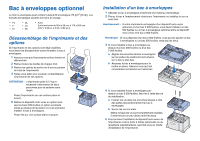
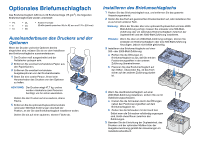
Disassembling the printer and options
If the printer and its options are already set up, you
must disassemble them before installing the envelope
drawer.
1
Make sure the printer is turned off and unplugged.
2
Remove any paper from the trays.
3
Remove any output options from the top of the
printer.
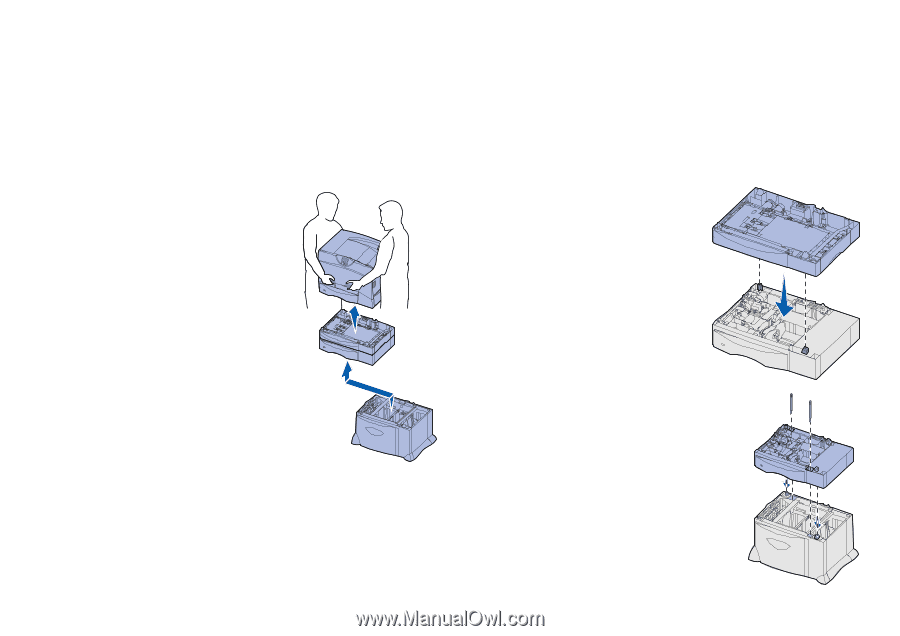
4
Have someone help you lift the printer off of the
options.
CAUTION:
The printer weighs 47.7 kg (105 lb)
and requires at least two people to lift
it safely.
Set the printer on a clean, flat surface.
5
Remove the optional duplex unit and any optional
500-sheet drawers above the position where you
want to install the envelope drawer.
Set them on a clean, flat surface.
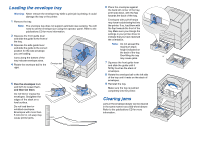
Installing the envelope drawer
1
Unpack the envelope drawer and remove any packing material.
2
Place the drawer in the location you have chosen for your printer or
install it on
another drawer.
Warning:
If you have an optional duplex unit and a 2000-sheet drawer, you
must install either one 500-sheet drawer or an optional envelope
drawer between the duplex unit and the 2000-sheet drawer.
Note:
If you have a 2000-sheet drawer, you can add either an envelope
drawer or one 500-sheet drawer, but not both.
3
If you are installing the envelope drawer on top
of a 500-sheet drawer or a 2000-sheet drawer:
a
Align the holes in the envelope drawer with
the positioning posts on the lower drawer.
b
Lower the envelope drawer into place.
Make sure it is seated securely on the
other drawer.
4
If you are installing the envelope drawer on top
of a 2000-sheet drawer, secure them with stabilizing
screws.
a
Insert the screws through the holes next to the
positioning posts on the envelope drawer.
b
Hand-tighten the screws.
Even when fully inserted, the screws allow some
space between the drawers.
5
Finish setting up the duplex unit, the printer, and
optional mailbox or output expander as instructed in
the printer
Setup Guide
.
•
7¾
•
9
•
10
•
DL
•
C5
•
B5
•
Other
(Size can vary from 98.4 x 62 mm to 176 x 250 mm
[3.87 x 6.38 in. to 6.93 x 9.84 in.])
© 2003 Lexmark International, Inc., All rights reserved.
P/N 15G1973
E.C. 3G0195
*15G1973*
Printed in China
9/03