Lexmark C752 Optional Envelope Drawer Sheet - Page 1
Lexmark C752 Manual
 |
View all Lexmark C752 manuals
Add to My Manuals
Save this manual to your list of manuals |
Page 1 highlights
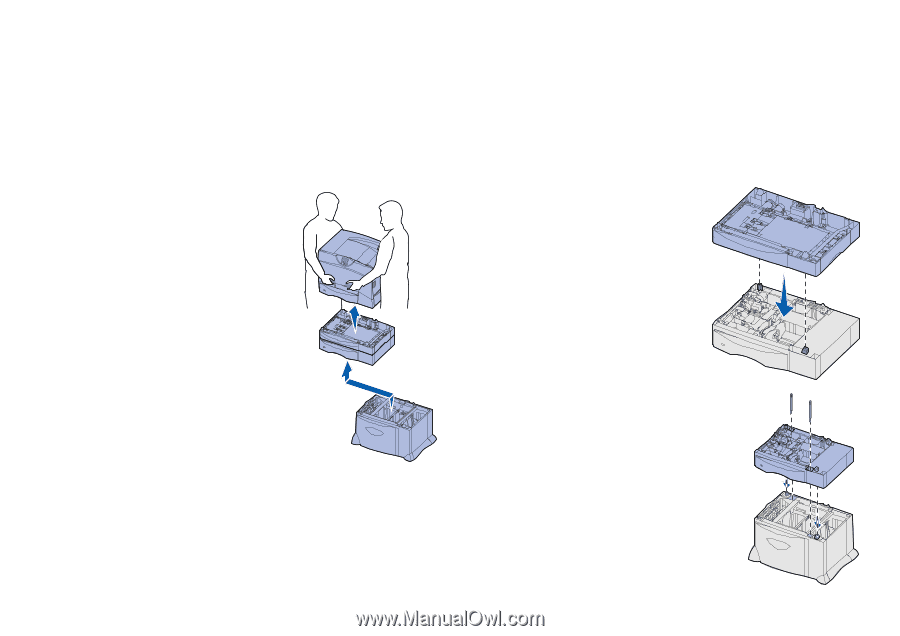
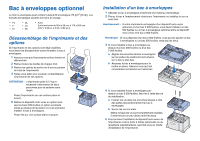
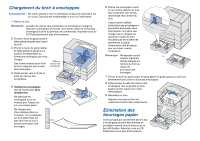
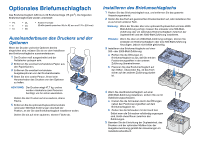
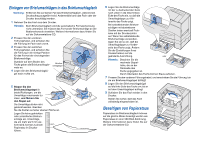
Optional Envelope Drawer The envelope tray can hold up to 60 envelopes (75 g/m2 [20 lb]). The following envelope sizes are supported: • 7¾ •9 • 10 • DL • C5 • B5 • Other (Size can vary from 98.4 x 62 mm to 176 x 250 mm [3.87 x 6.38 in. to 6.93 x 9.84 in.]) Disassembling the printer and options If the printer and its options are already set up, you must disassemble them before installing the envelope drawer. 1 Make sure the printer is turned off and unplugged. 2 Remove any paper from the trays. 3 Remove any output options from the top of the printer. 4 Have someone help you lift the printer off of the options. CAUTION: The printer weighs 47.7 kg (105 lb) and requires at least two people to lift it safely. Set the printer on a clean, flat surface. 5 Remove the optional duplex unit and any optional 500-sheet drawers above the position where you want to install the envelope drawer. Set them on a clean, flat surface. P/N 15G1973 E.C. 3G0195 © 2003 Lexmark International, Inc., All rights reserved. *15G1973* Printed in China 9/03 Installing the envelope drawer 1 Unpack the envelope drawer and remove any packing material. 2 Place the drawer in the location you have chosen for your printer or install it on another drawer. Warning: If you have an optional duplex unit and a 2000-sheet drawer, you must install either one 500-sheet drawer or an optional envelope drawer between the duplex unit and the 2000-sheet drawer. Note: If you have a 2000-sheet drawer, you can add either an envelope drawer or one 500-sheet drawer, but not both. 3 If you are installing the envelope drawer on top of a 500-sheet drawer or a 2000-sheet drawer: a Align the holes in the envelope drawer with the positioning posts on the lower drawer. b Lower the envelope drawer into place. Make sure it is seated securely on the other drawer. 4 If you are installing the envelope drawer on top of a 2000-sheet drawer, secure them with stabilizing screws. a Insert the screws through the holes next to the positioning posts on the envelope drawer. b Hand-tighten the screws. Even when fully inserted, the screws allow some space between the drawers. 5 Finish setting up the duplex unit, the printer, and optional mailbox or output expander as instructed in the printer Setup Guide.
-
 1
1 -
 2
2 -
 3
3 -
 4
4 -
 5
5 -
 6
6 -
 7
7 -
8
-
9
-
10
-
11
-
12
-
13
-
14
-
15
-
16
 |
 |