Lexmark C752 Optional Envelope Drawer Sheet - Page 2
Loading the envelope tray, Clearing jams
 |
View all Lexmark C752 manuals
Add to My Manuals
Save this manual to your list of manuals |
Page 2 highlights
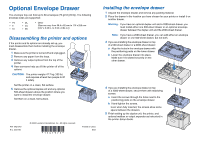
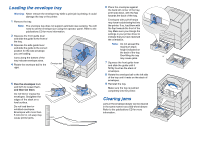
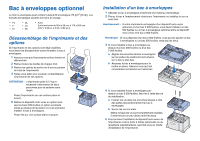
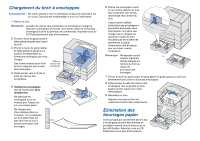
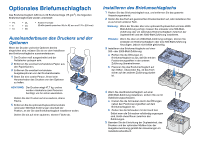
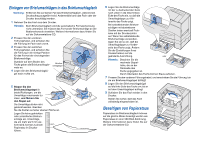
Loading the envelope tray 6 Place the envelopes against the back left corner of the tray, Warning: Never remove the envelope tray while a print job is printing. It could damage the tray or the printer. print side down, with the flap towards the back of the tray. 1 Remove the tray. Envelopes with pull-off strips may have trouble being fed into Note: The envelope tray does not support automatic size sensing. You will the printer. If so, load them with need to set the envelope size using the operator panel. Refer to the the flap towards the front of the publications CD for more information. tray. Make sure you change the 2 Squeeze the front guide lever settings in your printer driver to indicate that you have reversed and slide the guide to the front of the orientation. the tray. 3 Squeeze the side guide lever and slide the guide to the correct position for the size envelope you are loading. Icons along the bottom of the Note: Do not exceed the maximum stack height indicated on the back of the tray. Overfilling the tray or may cause jams. tray indicate envelope sizes. 4 Rotate the envelope bail to the Envelope bail 7 Squeeze the front guide lever and slide the guide until it right. firmly touches the stack of envelopes. 8 Rotate the envelope bail to the left side of the tray until it rests on the stack of envelopes. 5 Flex the envelopes back 9 Reinstall the tray. and forth to loosen them, and then fan them. Make sure the tray is pushed completely into the printer. Do not fold or crease the envelopes. Straighten the edges of the stack on a Clearing jams level surface. Do not load bent or wrinkled envelopes. Envelopes with more than 5 mm (0.2 in.) of warp may cause printer jams. 5 mm Jams in the envelope drawer can be cleared in the same manner as a 500-sheet drawer. Refer to the publications CD for more information.
-
 1
1 -
 2
2 -
 3
3 -
 4
4 -
 5
5 -
 6
6 -
 7
7 -
 8
8 -
9
-
10
-
11
-
12
-
13
-
14
-
15
-
16
 |
 |
