Lexmark C912 Quick Reference - Page 2
Loading paper - printer
 |
View all Lexmark C912 manuals
Add to My Manuals
Save this manual to your list of manuals |
Page 2 highlights
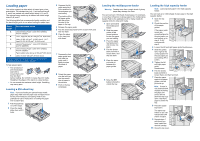
Loading paper Your printer supports a wide variety of paper types, sizes, and weights. The standard tray (tray 1) and optional trays 2, 3, and 4 are marked with stack height letters A, B, and C. The optional heavy media tray is marked with stack height letters D, E, and F. The following table lists recommended media, weights, and the stack height guide to use when loading the paper trays. Stack height Recommended media A Lexmark Glossy Paper*: Letter (P/N 12A5950), A4 (P/N 12A5951) B 11x17, Legal, B4, A3 (90-105 g/m2, 24-28 lb bond) C Letter, A4 (60-105 g/m2, 16-28 lb bond), 11x17, Legal, B4, A3 (60-90 g/m2, 16-24 lb bond) D Lexmark Transparency**: Letter (P/N 12A5940), A4 (P/N 12A5941) E Lexmark Glossy Paper*: Letter (P/N 12A5950), A4 (P/N 12A5951) Paper Labels: Letter, A4 (up to 180 g/m2, 48 lb bond) F Letter, A4 (105-128 g/m2, 28-34 lb bond) *Lexmark Glossy Paper is 120 g/m2, 80 lb. book, 32 lb bond. **Lexmark Transparency weight is 170 g/m2. To help prevent jams: • Flex all stacks of print media back and forth to loosen them, and then fan them before loading. Do not fold or crease the print media. Straighten the edges of the stack on a level surface. • Do not exceed the maximum stack height. Overfilling may cause jams. Loading a 550-sheet tray Note: If you are loading an optional heavy media paper tray, make sure the paper size and type are set for the print media you are loading. Refer to the publications CD for instructions on setting the paper size or paper type. 1 Pull the paper tray out until it stops. 2 Press the metal plate down until it locks. 3 Squeeze the left guide and slide it to the position for the size paper you are loading. The position of the left paper guide tells the printer the size of the paper in the tray. 4 Release the paper guide. 5 Flex the sheets back and forth to loosen them, and then fan them. 6 Place the paper in the tray, print side down. 7 Squeeze the front paper guide lever and slide the guide until it lightly touches the stack of paper. 8 Rotate the paper size dial until you see the correct size of paper in the window. 9 Push in the tray completely. Loading the multipurpose feeder Warning: Feeding more than a single sheet of glossy paper may damage the fuser. You can load up to 100 sheets of plain paper, 10 envelopes, or one sheet of banner or glossy paper in the multipurpose feeder. Refer to the publications CD or Setup Guide for capacity limits for other print media. 1 Open and extend the multipurpose feeder. 2 Slide the paper guides to the correct position for the size paper you are loading. 3 Press the paper feed plate down until it locks into place. 4 Flex the sheets back and forth to loosen them, and then fan them. 5 Place the paper print side up between the paper guides. 6 Move the SET button to the left to unlock the tray. Loading the high capacity feeder Note: Load only plain paper in the high capacity feeder. You can load up to 3,000 sheets of plain paper in the high capacity feeder. 1 Open the top cover. 2 Check the position of the paper guides. If the paper guide arrows are correctly aligned to the size paper you are loading, go to step 6. If not, continue with step 3. 3 Loosen the left and right paper guide thumbscrews. 4 Slide the guides left or right to the correct position for the size paper you are loading (A4 or Letter). 5 Tighten the left and right paper guide thumbscrews. 6 Flex the sheets back and forth to loosen them, and then fan them. 7 Place the paper against the paper guides, with the print side up. Note: If there is only a partial stack of paper in the tray, the paper low sensor will not allow the tray to go down. Add more paper to lower the tray. 8 Press the paper tray button. The paper tray lowers so you can load another 500 sheets of paper. 9 Repeat steps 7 and 8 until you have loaded the desired quantity. 10 Close the top cover.
-
 1
1 -
 2
2
 |
 |
