Lexmark CS720 User Guide - Page 85
Solid color or black images, Supplies Guide, Warning-Potential Damage - transfer module
 |
View all Lexmark CS720 manuals
Add to My Manuals
Save this manual to your list of manuals |
Page 85 highlights
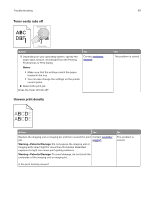
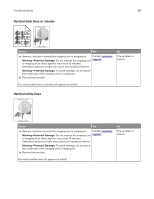
Troubleshooting 85 Action Yes 1 From the control panel, touch Help > Supplies Guide. 2 Measure the distance between the defects. • If the distance between the defects equals 43.90 mm (1.73 in.), or 45.50 mm (1.79 in.), then call customer support to replace the developer unit of the color where defects are seen. Contact customer support or your service representative. • If the distance between defects of a single color equals 94.20 mm (3.7 in.), 29.80 mm (1.17 in.), or 25.10 mm (0.99 in.), then replace the imaging unit or imaging kit. • If the distance between the defects equals 37.70 mm (1.48 in.), 78.50 mm (3.09 in.), or 55.0 mm (2.17 in.), then replace the transfer module. • If the distance between defects of all colors equals 95.0 mm (3.74 in.), 110 mm (4.33 in.), or 34.60 mm (1.36 in.), then replace the fuser. Do the repeating defects still appear? No The problem is solved. Solid color or black images Action Yes a Remove, and then reinstall the imaging unit or imaging kit. Contact customer Warning-Potential Damage: Do not expose the imaging unit support. or imaging kit to direct light for more than 10 minutes. Extended exposure to light may cause print quality problems. Warning-Potential Damage: To avoid damage, do not touch the underside of the imaging unit or imaging kit. b Resend the print job. No The problem is solved. Is the printer still printing solid color or black images?
-
 1
1 -
2
-
3
-
4
-
5
-
6
-
7
-
8
-
9
-
10
-
11
-
12
-
13
-
14
-
15
-
16
-
17
-
18
-
19
-
20
-
21
-
22
-
23
-
24
-
25
-
26
-
27
-
28
-
29
-
30
-
31
-
32
-
33
-
34
-
35
-
36
-
37
-
38
-
39
-
40
-
41
-
42
-
43
-
44
-
45
-
46
-
47
-
48
-
49
-
50
-
51
-
52
-
53
-
54
-
55
-
56
-
57
-
58
-
59
-
60
-
61
-
62
-
63
-
64
-
65
-
66
-
67
-
68
-
69
-
70
-
71
-
72
-
73
-
74
-
75
-
76
-
77
-
78
-
79
-
 80
80 -
 81
81 -
 82
82 -
 83
83 -
 84
84 -
 85
85 -
 86
86 -
 87
87 -
 88
88 -
 89
89 -
 90
90 -
91
-
92
-
93
-
94
-
95
-
96
-
97
-
98
-
99
-
100
-
101
-
102
-
103
-
104
-
105
-
106
-
107
-
108
-
109
-
110
-
111
-
112
-
113
-
114
-
115
-
116
-
117
 |
 |
