Lexmark CX924 Menus Guide - Page 25
Job Accounting, Advanced Imaging
 |
View all Lexmark CX924 manuals
Add to My Manuals
Save this manual to your list of manuals |
Page 25 highlights
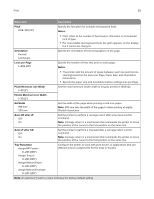
Print 25 Advanced Imaging Menu item Description Color Balance Cyan ‑5 to 5 (0*) Magenta ‑5 to 5 (0*) Yellow ‑5 to 5 (0*) Black ‑5 to 5 (0*) Reset Defaults Start Adjust the amount of toner being used for each color. Color Correction Off Auto* Manual Modify the color settings used to print documents. Notes: • Off sets the printer to receive the color correction from the software. • Auto sets the printer to apply different color profiles to each object on the printed page. • Manual allows the customization of the RGB or CMYK color conversions applied to each object on the printed page. Color Samples Print Color Samples Print sample pages for each of the RGB and CMYK color conversion tables used in the printer. Color Adjust Start Calibrate the printer to adjust color variations in the printed output. Spot Color Replacement Set Custom CMYK Assign specific CMYK values to twenty named spot colors. RGB Replacement Match the colors of the printed output to the original document. Notes: • This menu item requires that you select the Display‑True‑Black color table. • This menu item appears only in the Embedded Web Server. Note: An asterisk (*) next to a value indicates the factory default setting. Job Accounting Note: This menu appears only when a printer hard disk is installed. Menu item Description Job Accounting Off* On Set the printer to create a log of the print jobs that it receives. Note: An asterisk (*) next to a value indicates the factory default setting.
-
 1
1 -
2
-
3
-
4
-
5
-
6
-
7
-
8
-
9
-
10
-
11
-
12
-
13
-
14
-
15
-
16
-
17
-
18
-
19
-
 20
20 -
 21
21 -
 22
22 -
 23
23 -
 24
24 -
 25
25 -
 26
26 -
 27
27 -
 28
28 -
 29
29 -
 30
30 -
31
-
32
-
33
-
34
-
35
-
36
-
37
-
38
-
39
-
40
-
41
-
42
-
43
-
44
-
45
-
46
-
47
-
48
-
49
-
50
-
51
-
52
-
53
-
54
-
55
-
56
-
57
-
58
-
59
-
60
-
61
-
62
-
63
-
64
-
65
-
66
-
67
-
68
-
69
-
70
-
71
-
72
-
73
-
74
-
75
-
76
-
77
-
78
-
79
-
80
-
81
-
82
-
83
-
84
-
85
-
86
-
87
-
88
-
89
-
90
-
91
-
92
-
93
-
94
-
95
 |
 |
