Lexmark E120N User's Guide - Page 39
Using the operator panels, Jam at the input sensor, Jam between the input and exit sensors
 |
UPC - 734646466004
View all Lexmark E120N manuals
Add to My Manuals
Save this manual to your list of manuals |
Page 39 highlights
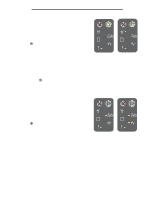
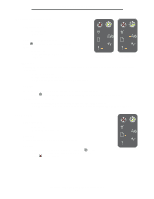
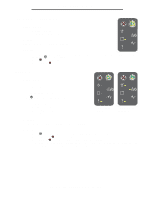
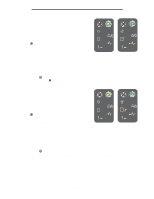
Using the operator panels Jam at the input sensor Note: All jams show the same primary code. To determine the jam location, view the secondary light sequence. Light sequence: • Continue-On • Paper Jam-On Secondary light sequence: Press twice quickly to see the secondary light sequence. • Continue-On • Ready / Data-On • Paper Jam-On Primary light sequence Secondary light sequence Message: A jam has occurred at the input sensor; it can be after the paper leaves the tray and enters the printer or in the priority feeder. Solution: See Clearing jams on page 53 for more information. Jam between the input and exit sensors Note: All jams show the same primary code. To determine the jam location, view the secondary light sequence. Light sequence: • Continue-On • Paper Jam-On Secondary light sequence: Press twice quickly to see the secondary light sequence. • Continue-On • Toner Low/Replace PC Kit-On • Paper Jam-On Primary light sequence Message: A jam has occurred and paper is between the printer input and exit sensors. Solution: See Clearing jams on page 53 for more information. Secondary light sequence Overview of the Lexmark E120n operator panel 39
-
 1
1 -
2
-
3
-
4
-
5
-
6
-
7
-
8
-
9
-
10
-
11
-
12
-
13
-
14
-
15
-
16
-
17
-
18
-
19
-
20
-
21
-
22
-
23
-
24
-
25
-
26
-
27
-
28
-
29
-
30
-
31
-
32
-
33
-
 34
34 -
 35
35 -
 36
36 -
 37
37 -
 38
38 -
 39
39 -
 40
40 -
 41
41 -
 42
42 -
 43
43 -
 44
44 -
45
-
46
-
47
-
48
-
49
-
50
-
51
-
52
-
53
-
54
-
55
-
56
-
57
-
58
-
59
-
60
-
61
-
62
-
63
-
64
-
65
-
66
-
67
-
68
-
69
-
70
-
71
-
72
-
73
-
74
-
75
-
76
-
77
-
78
-
79
-
80
-
81
-
82
-
83
-
84
-
85
-
86
-
87
 |
 |
