Lexmark MC3426 Users Guide PDF - Page 145
Clearing jams, Avoiding jams
 |
View all Lexmark MC3426 manuals
Add to My Manuals
Save this manual to your list of manuals |
Page 145 highlights
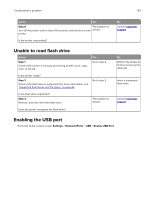
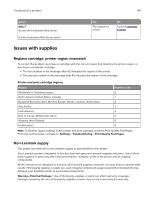
Troubleshoot a problem 145 To accept any and all of these risks and to proceed with the use of non-genuine supplies or parts in your printer, do either of the following: For touch‑screen printer models, press twice, and then press twice. For non‑touch‑screen printer models, press and hold X and simultaneously for 15 seconds. If you do not want to accept these risks, then remove the third-party supply or part from your printer and install a genuine Lexmark supply or part. For more information, see "Using genuine Lexmark parts and supplies" on page 119. For touch‑screen printer models, if the printer does not print after pressing pressing twice, then reset the supply usage counter. twice, and then For non‑touch‑screen printer models, if the printer does not print after pressing and holding X and simultaneously for 15 seconds, then reset the supply usage counter. 1 From the control panel, navigate to: Settings > Device > Maintenance > Config Menu > Supply Usage And Counters For non‑touch‑screen printer models, press to navigate through the settings. 2 Select the part or supply that you want to reset. 3 To clear the message, do either of the following: • For touch‑screen printer models, press twice, and then press twice. • For non‑touch‑screen printer models, press and hold X and simultaneously for 15 seconds. Note: If you are unable to reset the supply usage counters, then return the item to the place of purchase. Clearing jams Avoiding jams Load paper properly • Make sure that the paper lies flat in the tray. Correct loading of paper Incorrect loading of paper • Do not load or remove a tray while the printer is printing. • Do not load too much paper. Make sure that the stack height is below the maximum paper fill indicator.
-
 1
1 -
2
-
3
-
4
-
5
-
6
-
7
-
8
-
9
-
10
-
11
-
12
-
13
-
14
-
15
-
16
-
17
-
18
-
19
-
20
-
21
-
22
-
23
-
24
-
25
-
26
-
27
-
28
-
29
-
30
-
31
-
32
-
33
-
34
-
35
-
36
-
37
-
38
-
39
-
40
-
41
-
42
-
43
-
44
-
45
-
46
-
47
-
48
-
49
-
50
-
51
-
52
-
53
-
54
-
55
-
56
-
57
-
58
-
59
-
60
-
61
-
62
-
63
-
64
-
65
-
66
-
67
-
68
-
69
-
70
-
71
-
72
-
73
-
74
-
75
-
76
-
77
-
78
-
79
-
80
-
81
-
82
-
83
-
84
-
85
-
86
-
87
-
88
-
89
-
90
-
91
-
92
-
93
-
94
-
95
-
96
-
97
-
98
-
99
-
100
-
101
-
102
-
103
-
104
-
105
-
106
-
107
-
108
-
109
-
110
-
111
-
112
-
113
-
114
-
115
-
116
-
117
-
118
-
119
-
120
-
121
-
122
-
123
-
124
-
125
-
126
-
127
-
128
-
129
-
130
-
131
-
132
-
133
-
134
-
135
-
136
-
137
-
138
-
139
-
 140
140 -
 141
141 -
 142
142 -
 143
143 -
 144
144 -
 145
145 -
 146
146 -
 147
147 -
 148
148 -
 149
149 -
 150
150 -
151
-
152
-
153
-
154
-
155
-
156
-
157
-
158
-
159
-
160
-
161
-
162
-
163
-
164
-
165
-
166
-
167
-
168
-
169
-
170
-
171
-
172
-
173
-
174
-
175
-
176
-
177
-
178
-
179
-
180
-
181
-
182
-
183
-
184
-
185
-
186
-
187
-
188
-
189
-
190
-
191
-
192
-
193
-
194
-
195
-
196
-
197
-
198
-
199
-
200
-
201
-
202
-
203
-
204
-
205
-
206
-
207
-
208
-
209
-
210
-
211
-
212
-
213
-
214
-
215
-
216
-
217
-
218
-
219
-
220
-
221
 |
 |