Lexmark MX410 Quick Reference - Page 14
Scanning
 |
View all Lexmark MX410 manuals
Add to My Manuals
Save this manual to your list of manuals |
Page 14 highlights
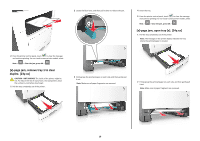
2 If you are loading a document into the ADF tray, then adjust the paper guides. 3 From the printer control panel, press #, and then enter the shortcut number using the keypad. 4 Touch Fax It. Sending a fax using the address book The address book feature lets you search for bookmarks and network directory servers. Note: If the address book feature is not enabled, then contact your system support person. 1 Load an original document faceup, short edge first into the ADF tray or facedown on the scanner glass. Notes: • Do not load postcards, photos, small items, transparencies, photo paper, or thin media (such as magazine clippings) into the ADF tray. Place these items on the scanner glass. • The ADF indicator light comes on when the paper is loaded properly. 2 If you are loading a document into the ADF tray, then adjust the paper guides. 3 From the home screen, navigate to: Fax > > type the name of the recipient > Note: You can only search for one name at a time. 4 Touch the name of the recipient, and then touch Fax It. Sending a fax at a scheduled time 1 Load an original document faceup, short edge first into the ADF tray or facedown on the scanner glass. Notes: • Do not load postcards, photos, small items, transparencies, photo paper, or thin media (such as magazine clippings) into the ADF tray. Place these items on the scanner glass. • The ADF indicator light comes on when the paper is loaded properly. 2 If you are loading a document into the ADF tray, then adjust the paper guides. 3 From the home screen, navigate to: Fax > enter the fax number > Delayed Send Note: If Fax Mode is set to Fax Server, then the Delayed Send button will not appear. Faxes waiting for transmission are listed in the fax queue. 4 Specify the time the fax will be transmitted, and then touch . The time is increased or decreased in 30‑minute increments. 5 Touch Fax It. Note: The document is scanned and then faxed at the scheduled time. Creating shortcuts Creating a fax destination shortcut using the Embedded Web Server Assign a shortcut number to a single fax number or a group of fax numbers. 1 Open a Web browser, and then type the printer IP address in the address field. Notes: • View the printer IP address on the printer home screen. The IP address appears as four sets of numbers separated by periods, such as 123.123.123.123. • If you are using a proxy server, then temporarily disable it to load the Web page correctly. 2 Click Settings > Manage Shortcuts > Fax Shortcut Setup. Note: A password may be required. If you do not have an ID and password, then contact your system support person. 3 Type a name for the shortcut, and then enter the fax number. Notes: • To create a multiple‑number shortcut, enter the fax numbers for the group. • Separate each fax number in the group with a semicolon (;). 4 Assign a shortcut number. Note: If you enter a number that is already in use, then you are prompted to select another number. 5 Click Add. 14 Creating a fax destination shortcut using the printer control panel 1 From the home screen, touch Fax, and then enter the fax number. To create a group of fax numbers, touch other fax number. 2 Touch . , and then enter the 3 Type a unique name for the shortcut, and then touch . 4 Verify that the shortcut name and number are correct, and then touch OK. If the name or number is incorrect, then touch Cancel, and then reenter the information. Scanning Using Scan to Network Scan to Network lets you scan your documents to network destinations specified by your system support person. After the destinations (shared network folders) have been established on the network, the setup process for the application involves installing and configuring the application on the appropriate printer using its Embedded Web Server. For more information, see "Setting up Scan to Network" on page 4. Scanning to an FTP address Scanning to an FTP address Scanning to an FTP address using the printer control panel 1 Load an original document faceup, short edge first into the ADF tray or facedown on the scanner glass. Notes: • Do not load postcards, photos, small items, transparencies, photo paper, or thin media (such as magazine clippings) into the ADF tray. Place these items on the scanner glass. • The ADF indicator light comes on when the paper is loaded properly.
-
 1
1 -
2
-
3
-
4
-
5
-
6
-
7
-
8
-
 9
9 -
 10
10 -
 11
11 -
 12
12 -
 13
13 -
 14
14 -
 15
15 -
 16
16 -
 17
17 -
 18
18 -
 19
19 -
20
 |
 |