Lexmark W820dn Setup Guide - Page 61
Positioning the mailbox
 |
UPC - 734646210522
View all Lexmark W820dn manuals
Add to My Manuals
Save this manual to your list of manuals |
Page 61 highlights
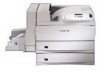
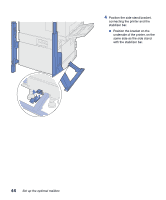
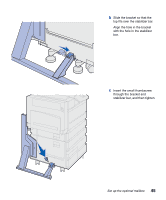
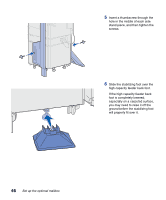
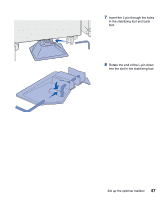
Positioning the mailbox CAUTION! The mailbox requires two people to lift it safely. Note: Be sure the mailbox cord is between the printer and the stand when you lower the mailbox. Do not pinch the cord as you position the mailbox. Horizontal bar 1 Be sure you have removed the stacking arm from the printer. (See "Removing the stacking arm" on page 40). 2 Have someone help you lift the mailbox, using the horizontal bar and the handling tool on the opposite side. 3 Align the mailbox post with the stand rail. Mailbox post Divertor Gate G Metal pin Handling tool Stand rail Warning! Do not rest the mailbox on Divertor Gate G when seating the mailbox. 4 Carefully lower the mailbox onto the stand. Align the metal pin on the stand with the hole in the mailbox post. The mailbox is fully seated on the stand rail when properly installed. Set up the optional mailbox 49
-
 1
1 -
2
-
3
-
4
-
5
-
6
-
7
-
8
-
9
-
10
-
11
-
12
-
13
-
14
-
15
-
16
-
17
-
18
-
19
-
20
-
21
-
22
-
23
-
24
-
25
-
26
-
27
-
28
-
29
-
30
-
31
-
32
-
33
-
34
-
35
-
36
-
37
-
38
-
39
-
40
-
41
-
42
-
43
-
44
-
45
-
46
-
47
-
48
-
49
-
50
-
51
-
52
-
53
-
54
-
55
-
 56
56 -
 57
57 -
 58
58 -
 59
59 -
 60
60 -
 61
61 -
 62
62 -
 63
63 -
 64
64 -
 65
65 -
 66
66 -
67
-
68
-
69
-
70
-
71
-
72
-
73
-
74
-
75
-
76
-
77
-
78
-
79
-
80
-
81
-
82
-
83
-
84
-
85
-
86
-
87
-
88
-
89
-
90
-
91
-
92
-
93
-
94
-
95
-
96
-
97
-
98
-
99
-
100
-
101
-
102
-
103
-
104
-
105
-
106
-
107
-
108
-
109
-
110
-
111
-
112
-
113
-
114
-
115
-
116
-
117
-
118
-
119
-
120
-
121
-
122
-
123
-
124
-
125
-
126
 |
 |
