Lexmark W850 Maintenance Guide - Page 8
Replacing the photoconductor, Photoconductor low
 |
View all Lexmark W850 manuals
Add to My Manuals
Save this manual to your list of manuals |
Page 8 highlights
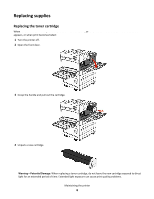
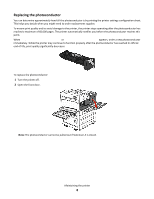
Replacing the photoconductor You can determine approximately how full the photoconductor is by printing the printer settings configuration sheet. This helps you decide when you might need to order replacement supplies. To ensure print quality and to avoid damage to the printer, the printer stops operating after the photoconductor has reached a maximum of 60,000 pages. The printer automatically notifies you before the photoconductor reaches this point. When 84 Replace photoconductor or 84 Photoconductor low appears, order a new photoconductor immediately. While the printer may continue to function properly after the photoconductor has reached its official end-of-life, print quality significantly decreases. To replace the photoconductor: 1 Turn the printer off. 2 Open the front door. Note: The photoconductor cannot be pulled out if Side Door A is closed. Maintaining the printer 8
-
 1
1 -
2
-
 3
3 -
 4
4 -
 5
5 -
 6
6 -
 7
7 -
 8
8 -
 9
9 -
 10
10 -
 11
11 -
 12
12 -
 13
13 -
14
-
15
 |
 |
