Lexmark X203 User Guide - Page 155
Clipped images, Check the guides, Check the paper size setting, Gray background
 |
View all Lexmark X203 manuals
Add to My Manuals
Save this manual to your list of manuals |
Page 155 highlights
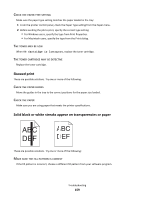
Clipped images These are possible solutions. Try one or more of the following: CHECK THE GUIDES Move the width and length guides in the tray to the correct positions for the paper size loaded. CHECK THE PAPER SIZE SETTING Make sure the paper size setting matches the paper loaded in the tray: 1 From the printer control panel, check the Paper Size setting from the Paper menu. 2 Before sending the job to print, specify the correct size setting: • For Windows users, specify the size from Print Properties. • For Macintosh users, specify the size from the Page Setup dialog. Gray background ABCDE ABCDE ABCDE CHECK THE TONER DARKNESS SETTING Select a lighter Toner Darkness setting: • From the printer control panel, change the setting from the Quality menu. • For Windows users, change the setting from Print Properties. • For Macintosh users, change the setting from the Print dialog. Ghost images ABCDE ABCDE ABCDE These are possible solutions. Try one or more of the following: Troubleshooting 155
-
 1
1 -
2
-
3
-
4
-
5
-
6
-
7
-
8
-
9
-
10
-
11
-
12
-
13
-
14
-
15
-
16
-
17
-
18
-
19
-
20
-
21
-
22
-
23
-
24
-
25
-
26
-
27
-
28
-
29
-
30
-
31
-
32
-
33
-
34
-
35
-
36
-
37
-
38
-
39
-
40
-
41
-
42
-
43
-
44
-
45
-
46
-
47
-
48
-
49
-
50
-
51
-
52
-
53
-
54
-
55
-
56
-
57
-
58
-
59
-
60
-
61
-
62
-
63
-
64
-
65
-
66
-
67
-
68
-
69
-
70
-
71
-
72
-
73
-
74
-
75
-
76
-
77
-
78
-
79
-
80
-
81
-
82
-
83
-
84
-
85
-
86
-
87
-
88
-
89
-
90
-
91
-
92
-
93
-
94
-
95
-
96
-
97
-
98
-
99
-
100
-
101
-
102
-
103
-
104
-
105
-
106
-
107
-
108
-
109
-
110
-
111
-
112
-
113
-
114
-
115
-
116
-
117
-
118
-
119
-
120
-
121
-
122
-
123
-
124
-
125
-
126
-
127
-
128
-
129
-
130
-
131
-
132
-
133
-
134
-
135
-
136
-
137
-
138
-
139
-
140
-
141
-
142
-
143
-
144
-
145
-
146
-
147
-
148
-
149
-
 150
150 -
 151
151 -
 152
152 -
 153
153 -
 154
154 -
 155
155 -
 156
156 -
 157
157 -
 158
158 -
 159
159 -
 160
160 -
161
-
162
-
163
-
164
-
165
-
166
-
167
-
168
-
169
-
170
-
171
-
172
-
173
-
174
-
175
-
176
-
177
-
178
-
179
-
180
-
181
-
182
-
183
-
184
-
185
 |
 |
