Lexmark X203n Embedded Web Server Administrator's Guide - Page 14
Using NTLM authentication, Setting date and time - manual
 |
View all Lexmark X203n manuals
Add to My Manuals
Save this manual to your list of manuals |
Page 14 highlights
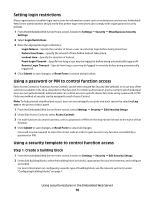
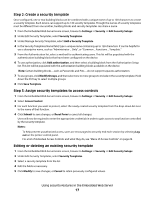
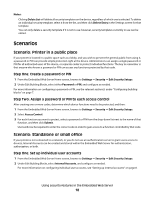
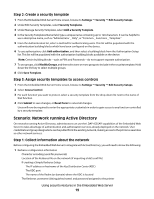
Setting date and time Because Kerberos servers require that key requests bear a recent timestamp (usually within 300 seconds), the printer clock must be in sync or closely aligned with the KDC system clock. Printer clock settings can be updated manually, or set to use Network Time Protocol (NTP), to automatically sync with a trusted clock-typically the same one used by the Kerberos server. 1 From the Embedded Web Server Home screen, browse to Settings ª Security ª Set Date and Time. 2 To manage the settings manually, type the correct date and time in YYYY-MM-DD HH:MM format, and then choose from the Time Zone drop-down list. Notes: • Entering manual settings automatically disables use of NTP. • Choosing "(UTC+user) Custom" from the Time Zone list will require configuration of additional settings under Custom Time Zone Setup. 3 If Daylight Saving Time (DST) is observed in your area, click the Automatically Observe DST check box. 4 If you are located in a non-standard time zone or an area that observes an alternate DST calendar, adjust the Custom Time Zone Setup settings as needed. 5 To sync to an NTP server rather than manage date and time settings manually, click the Enable NTP check box, and then type the IP address or hostname of the NTP Server. 6 If the NTP server requires authentication, click the Enable Authentication check box, and then use the "Install auth keys" link to browse to the file containing the NTP authentication credentials. 7 Click Submit to save changes, or Reset Form to restore default values. Using NTLM authentication NTLM (Windows NT LAN Manager) is Microsoft's solution for enabling authentication without requiring the transmission of a user's password across a network in clear text. Instead of comparing the user's actual password, the NTLM server and the client generate and compare three encrypted strings based on the user's password. An administrator can store only one NTLM configuration on a supported device because each device can only be registered to a single NT domain. Notes: • The NTLM building block can be used in a security template only after a supported device has registered with the NTLM domain. • The NTLM building block cannot be deleted or unregistered if it is being used as part of a security template. • As with any form of authentication that relies on an external server, users will not be able to access protected device functions in the event of an outage that prevents the printer from communicating with the authenticating server. • To help prevent unauthorized access, users are encouraged to securely end each session by selecting Log out on the printer control panel. Using security features in the Embedded Web Server 14
-
 1
1 -
2
-
3
-
4
-
5
-
6
-
7
-
8
-
 9
9 -
 10
10 -
 11
11 -
 12
12 -
 13
13 -
 14
14 -
 15
15 -
 16
16 -
 17
17 -
 18
18 -
 19
19 -
20
-
21
-
22
-
23
-
24
-
25
-
26
-
27
-
28
-
29
-
30
-
31
-
32
-
33
-
34
-
35
-
36
-
37
-
38
-
39
-
40
 |
 |