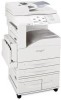
Lexmark X854E User's Reference - Page 19
Custom Scan to PC settings, Place Next Or Stop - ps
 |
UPC - 734646002813
View all Lexmark X854E manuals
Add to My Manuals
Save this manual to your list of manuals |
Page 19 highlights
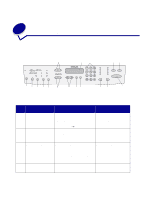
4 Press Menu > repeatedly until you see your scan profile name. 5 Press Go/Send to start scanning. Note: If you are using the flatbed of the scanner, watch the control panel for messages. If prompted to Place Next Or Stop, place the next page on the flatbed and then press Go/Send to continue scanning. Press Stop/Clear when all the pages have been scanned. 6 Return to your PC when the job is finished. The job status window changes to Image Received. Once your scan output file appears in the list, you can select it and launch an application to open the file. Note: PC Scan Profiles are not stored. Once they are used, they disappear from the control panel list. Custom Scan to PC settings Menu Quick Setup Format Type Compression Contrast Scan Depth Resolution Original Size Orientation Settings Description Custom Lets you customize the scan job settings. Text --BW PDF Text -- BW TIFF Mixed -- Gray PDF Mixed -- Color PDF Photo -- Color JPEG Photo -- Color TIFF Photo -- Gray JPEG Photo -- Gray TIFF Lists preset formats. Lets you customize the brightness, set the size of your originals, and the orientation of your scan file output. (Color is only available if your scanner supports color.) JPEG, PDF, TIFF and PostScript (PS) Determines the final output format of the scanned document. None, JPEG, ZLib, G4 Determines the compression format used to compress the scanned document output file. Text, Mixed, Photo Describes the content of the originals being scanned. RGB (available only with color Describes the color scale of the originals being scanners) scanned. Gray, BW (Black and White) 75, 150, 200, 300, 400, and 600 dpi Sets the resolution of the scanned document output file. Letter, Legal, A4, and so on. Tells the scanner the paper size of the originals being scanned. Portrait, Landscape Determines the orientation of your scanned document output file. Custom Scan to PC settings 14
-
 1
1 -
2
-
3
-
4
-
5
-
6
-
7
-
8
-
9
-
10
-
11
-
12
-
13
-
 14
14 -
 15
15 -
 16
16 -
 17
17 -
 18
18 -
 19
19 -
 20
20 -
 21
21 -
 22
22 -
 23
23 -
 24
24 -
25
-
26
-
27
-
28
-
29
-
30
-
31
-
32
-
33
-
34
-
35
-
36
-
37
-
38
-
39
-
40
-
41
-
42
-
43
-
44
-
45
-
46
-
47
-
48
-
49
-
50
-
51
-
52
-
53
-
54
-
55
-
56
-
57
-
58
-
59
-
60
-
61
 |
 |
