Lexmark Z1520 User's Guide (Mac) - Page 93
Print speed is slow, Partial document or photo prints
 |
View all Lexmark Z1520 manuals
Add to My Manuals
Save this manual to your list of manuals |
Page 93 highlights
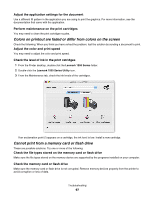
4 Choose an orientation. 5 Click OK. Make sure paper size matches the printer setting 1 From the software application, click File Œ Page Setup. 2 From the "Format for" pop-up menu, choose 1500 Series. 3 From the Paper Size pop-up menu, check the paper size. Clean print cartridge nozzles For more information, see "Cleaning the print cartridge nozzles" on page 60. Print speed is slow These are possible solutions. Try one or more of the following: Maximize computer processing speed • Close all applications not in use. • Try minimizing the number and size of graphics and images in the document. • Remove as many unused fonts as possible from your system. Add memory to your computer Consider purchasing more RAM. Select a lower print quality 1 From the software application, click File Œ Print. 2 From the third pop-up menu from the top, choose Quality & Media. 3 From the Print Quality menu, select Normal. Remove and reinstall the software It is sometimes helpful to remove the existing printer software and reinstall it. For more information, see "Removing and reinstalling the software" on page 107. Partial document or photo prints Check that the paper size being used matches the printer setting 1 With a document or photo open, choose File Œ Page Setup. The Page Setup dialog appears. See "Using the Page Setup dialog" on page 49. 2 From the "Format for" pop-up menu, choose 1500 Series. 3 From the "Paper size" pop-up menu, choose the correct paper size. 4 Click OK. Partial photo prints when using a PictBridge-enabled digital camera Make sure photo size and paper size are set correctly Make sure the photo paper in the paper support matches the photo size or print size selected on your digital camera. Troubleshooting 93
-
 1
1 -
2
-
3
-
4
-
5
-
6
-
7
-
8
-
9
-
10
-
11
-
12
-
13
-
14
-
15
-
16
-
17
-
18
-
19
-
20
-
21
-
22
-
23
-
24
-
25
-
26
-
27
-
28
-
29
-
30
-
31
-
32
-
33
-
34
-
35
-
36
-
37
-
38
-
39
-
40
-
41
-
42
-
43
-
44
-
45
-
46
-
47
-
48
-
49
-
50
-
51
-
52
-
53
-
54
-
55
-
56
-
57
-
58
-
59
-
60
-
61
-
62
-
63
-
64
-
65
-
66
-
67
-
68
-
69
-
70
-
71
-
72
-
73
-
74
-
75
-
76
-
77
-
78
-
79
-
80
-
81
-
82
-
83
-
84
-
85
-
86
-
87
-
 88
88 -
 89
89 -
 90
90 -
 91
91 -
 92
92 -
 93
93 -
 94
94 -
 95
95 -
 96
96 -
 97
97 -
 98
98 -
99
-
100
-
101
-
102
-
103
-
104
-
105
-
106
-
107
-
108
-
109
-
110
-
111
-
112
-
113
-
114
-
115
-
116
-
117
-
118
-
119
-
120
-
121
-
122
-
123
-
124
 |
 |
