Lexmark Z645 User's Guide for Windows - Page 7
Customizing the settings for your document, Quality/Copies tab - ink cartridge
 |
UPC - 734646009133
View all Lexmark Z645 manuals
Add to My Manuals
Save this manual to your list of manuals |
Page 7 highlights
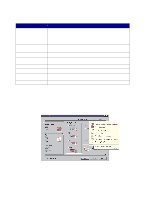
• Quality/Speed: Normal • Type: Plain Paper • Paper Size: A4 or Letter • Orientation: Portrait • Layout: Normal For more information about the printer settings for different types of print jobs, see "Printing ideas" on page 10. Customizing the settings for your document 1 With your document open, click File Print. The Print dialog box appears. 2 From the Print dialog box, click Properties, Preferences, or Options. 3 From the Quality/Copies tab, select a print quality setting. 4 From the Paper Setup tab, select a paper type and size setting. 5 From the Print Layout tab, change the layout of your document. 6 Click OK to apply your settings. Quality/Copies tab From: Quality/Speed Multiple Copies Select: • Quick Print when you want to print documents quickly, but with reduced print quality. • Normal when you want to print most documents on plain paper. • Better when you want to print photos and documents containing graphics on coated or glossy paper. • Best when you want to print crisp photos and high resolution graphics, but with reduced speeds. • Collate Copies if you want to print more than one copy of a document. This option prints all the pages of the first copy, and then all the pages of the second copy, and so on. • Print Last Page First if you want to print the pages in reverse order. • The number of copies you want to print. Print Color Images in Black and White to save the ink in your color cartridge. Note: This option is not available if a black cartridge is not installed. Understanding the printer software 7
-
 1
1 -
 2
2 -
 3
3 -
 4
4 -
 5
5 -
 6
6 -
 7
7 -
 8
8 -
 9
9 -
 10
10 -
 11
11 -
 12
12 -
13
-
14
-
15
-
16
-
17
-
18
-
19
-
20
-
21
-
22
-
23
-
24
-
25
-
26
-
27
-
28
-
29
-
30
-
31
-
32
-
33
-
34
-
35
-
36
-
37
-
38
-
39
-
40
-
41
-
42
-
43
-
44
-
45
-
46
-
47
-
48
-
49
-
50
-
51
-
52
-
53
-
54
-
55
-
56
-
57
-
58
-
59
-
60
-
61
-
62
-
63
-
64
-
65
-
66
-
67
-
68
-
69
 |
 |
