LiftMaster 1355 1355 Manual - Page 2

Warning, Caution - and reviews

Page 2 highlights

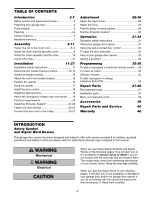
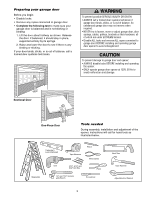
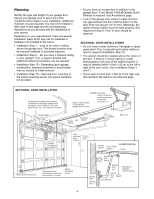
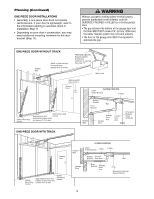
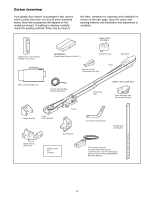
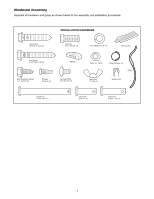
TABLE OF CONTENTS Introduction 2-7 Safety symbol and signal word review 2 Preparing your garage door 3 Tools needed 3 Planning 4-5 Carton inventory 6 Hardware inventory 7 Assembly 8-11 Fasten the rail to the motor unit 8, 9 Install the chain and the sprocket cover 8 Install the chain spreader and the chain 10 Tighten the chain 11 Installation 11-27 Installation safety instructions 11 Determine the header bracket location 12-13 Install the header bracket 14 Attach the rail to the header bracket 15 Position the opener 16 Hang the opener 17 Install the door control 18 Install the light and lens 19 Attach the emergency release rope and handle .......19 Electrical requirements 20 Install the Protector System 21-23 Fasten the door bracket 24-25 Connect the door arm to the trolley 26-27 Adjustment 28-30 Adjust the travel limits 28 Adjust the force 29 Test the safety reversal system 30 Test the Protector System 30 Operation 31-34 Operation safety instructions 31 Using your garage door opener 31 Using the wall-mounted door control 32 To open the door manually 32 Care of your garage door opener 33 Having a problem 34 Programming 35-36 To add or reprogram a hand-held remote control .....35 To erase all codes 35 3-Button remotes 35 To add, reprogram or change a Keyless Entry PIN 36 Repair Parts 37-38 Rail assembly parts 37 Installation parts 37 Motor unit assembly parts 38 Accessories 39 Repair Parts and Service 40 Warranty 40 INTRODUCTION Safety Symbol and Signal Word Review This garage door opener has been designed and tested to offer safe service provided it is installed, operated, maintained and tested in strict accordance with the instructions and warnings contained in this manual. WARNING Mechanical WCAAURTNIOINNG WEAleRctNricINal G WARNING CAUTION WARNING When you see these Safety Symbols and Signal Words on the following pages, they will alert you to the possibility of serious injury or death if you do not comply with the warnings that accompany them. WARNING The hazard may come from something mechanical or from electric shock. Read the warnings carefully. WARNING When you see this Signal Word on the following pages, it will alert you to the possibility of damage to WARNING your garage door and/or the garage door opener if you do not comply with the cautionary statements that accompany it. Read them carefully. 2

  • 1
  • 2
  • 3
  • 4
  • 5
  • 6
  • 7
  • 8
  • 9
  • 10
  • 11
  • 12
  • 13
  • 14
  • 15
  • 16
  • 17
  • 18
  • 19
  • 20
  • 21
  • 22
  • 23
  • 24
  • 25
  • 26
  • 27
  • 28
  • 29
  • 30
  • 31
  • 32
  • 33
  • 34
  • 35
  • 36
  • 37
  • 38
  • 39
  • 40

2
When you see these Safety Symbols and Signal
Words on the following pages, they will alert you to
the possibility of
serious injury or death
if you do
not comply with the warnings that accompany them.
The hazard may come from something mechanical
or from electric shock. Read the warnings carefully.
When you see this Signal Word on the following
pages, it will alert you to the possibility of damage to
your garage door and/or the garage door opener if
you do not comply with the cautionary statements
that accompany it. Read them carefully.
INTRODUCTION
Safety Symbol
and Signal Word Review
This garage door opener has been designed and tested to offer safe service provided it is installed, operated,
maintained and tested in strict accordance with the instructions and warnings contained in this manual.
Mechanical
Electrical
WARNING
WARNING
CAUTION
Introduction
2-7
Safety symbol and signal word review
........................
2
Preparing your garage door
........................................
3
Tools needed
...............................................................
3
Planning
..................................................................
4-5
Carton inventory
..........................................................
6
Hardware inventory
.....................................................
7
Assembly
8-11
Fasten the rail to the motor unit
..............................
8, 9
Install the chain and the sprocket cover
.....................
8
Install the chain spreader and the chain
...................
10
Tighten the chain
.......................................................
11
Installation
11-27
Installation safety instructions
....................................
11
Determine the header bracket location
................
12-13
Install the header bracket
..........................................
14
Attach the rail to the header bracket
.........................
15
Position the opener
...................................................
16
Hang the opener
.......................................................
17
Install the door control
...............................................
18
Install the light and lens
............................................
19
Attach the emergency release rope and handle
.......
19
Electrical requirements
..............................................
20
Install the Protector System
®
................................
21-23
Fasten the door bracket
.......................................
24-25
Connect the door arm to the trolley
.....................
26-27
Adjustment
28-30
Adjust the travel limits
...............................................
28
Adjust the force
.........................................................
29
Test the safety reversal system
.................................
30
Test the Protector System
®
........................................
30
Operation
31-34
Operation safety instructions
.....................................
31
Using your garage door opener
................................
31
Using the wall-mounted door control
........................
32
To open the door manually
........................................
32
Care of your garage door opener
..............................
33
Having a problem?
....................................................
34
Programming
35-36
To add or reprogram a hand-held remote control
.....
35
To erase all codes
.....................................................
35
3-Button remotes
.......................................................
35
To add, reprogram or change
a Keyless Entry PIN
..................................................
36
Repair Parts
37-38
Rail assembly parts
...................................................
37
Installation parts
........................................................
37
Motor unit assembly parts
.........................................
38
Accessories
39
Repair Parts and Service
40
Warranty
40
TABLE OF CONTENTS