LiftMaster 3840 3840 Manual - Page 16
Installation Step 7 - battery
 |
View all LiftMaster 3840 manuals
Add to My Manuals
Save this manual to your list of manuals |
Page 16 highlights
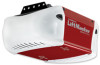
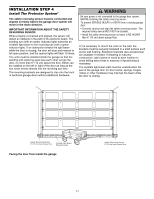
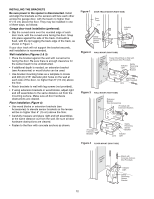
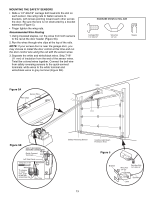
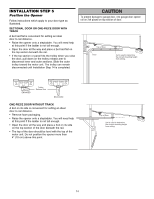
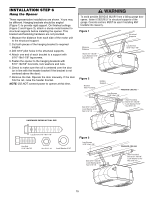
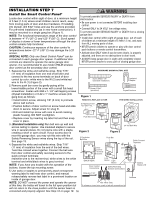
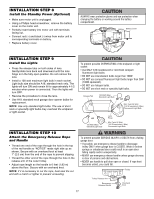
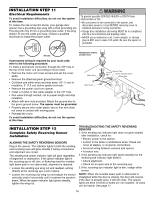
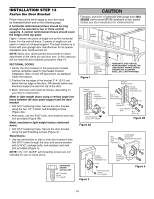
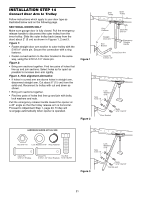
INSTALLATION STEP 7 Install the Smart Control Panel® Locate door control within sight of door, at a minimum height of 5 feet (1.5 m) where small children cannot reach, away from moving parts of door and door hardware. If installing into drywall, drill 5/32" holes and use the anchors provided. For pre-wired installations (as in new home construction), it may be mounted to a single gang box (Figure 1). NOTE: The functional temperature range of the door control is between -4° F (-20° C) and 122° F (50° C). Scroll speed of display is slower at lower temperatures although the door control remains fully functional. CAUTION: Continuous exposure of the door control to temperatures below -22° F (-30° C) may damage the LCD screen. SPECIAL NOTE: Only one Smart Control Panel® can be connected to each garage door opener. If additional door controls are desired to operate the same garage door To prevent possible SERIOUS INJURY or DEATH from electrocution: • Be sure power is not connected BEFORE installing door control. • Connect ONLY to 24 VOLT low voltage wires. To prevent possible SERIOUS INJURY or DEATH from a closing garage door: • Install door control within sight of garage door, out of reach of children at a minimum height of 5 feet (1.5 m), and away from ALL moving parts of door. • NEVER permit children to operate or play with door control push buttons or remote control transmitters. • Activate door ONLY when it can be seen clearly, is properly adjusted, and there are no obstructions to door travel. • ALWAYS keep garage door in sight until completely closed. NEVER permit anyone to cross path of closing garage door. opener, it is recommended to use model 378LM wireless door control as the secondary door control. 1. Separate the white and red/white wires. Strip 7/16" HARDWARE SHOWN ACTUAL SIZE (11 mm) of insulation from one end of bell wire and connect to the two screw terminals on back of door control by color: white wire to the W (2) and white/red wire to the R (1) (Figure 2). Screw 6ABx1-1/4" (standard installation) Insulated Staples 2. Remove push bar cover by gently prying at the lower/middle portion of the cover with a small flat-head screwdriver. Fasten with 6AB x 1-1/4" self-tapping screws Screw 6-32x1" (pre-wired) Drywall Anchors (drywall installation) or 6-32 x 1" machine screws (into gang box) as follows: Figure 1 • Install bottom screw, allowing 1/8" (3 mm) to protrude REMOVE & REPLACE COVER PRE-WIRED INSTALLATION above wall surface. • Position bottom of door control on screw head and slide To Replace Insert Top Tabs First down to secure. Adjust screw for snug fit. • Drill and install top screw with care to avoid cracking plastic housing. DO NOT overtighten. • Replace cover by inserting top tabs first and then snap Push Bar Cover LOCK LIGHT cover in place. 3. (Standard installation only) Run bell wire up wall and across ceiling to opener. Use insulated staples to secure wire in several places. Do not pierce wire with a staple, creating a short or open circuit. If your access door is Figure 2 LOCK LIGHT Figure 3 24 Volt Bell Wire near the garage door, you may run this wire with the Safety Reversing Sensor wires along the top of the rail. See page 13. 4. Separate the white and red/white wires. Strip 7/16" 2-Conductor Bell Wire Push Bar Quick-Connect Terminals (11 mm) of insulation from the end of the bell wires. Twist like colored wires together. Connect the bell wire from door control and safety reversing sensors to the quick-connect terminals: red/white wire to the red terminal, white wires to the white terminal and white/black wires to grey terminal. NOTE: If you have any trouble with the operation of the buttons, loosen the top mounting screw. 5. Use tacks or staples to permanently attach entrapment warning label to wall near door control, and manual release/safety reverse test label in a prominent location on inside of garage door. R W 1 2 (BACK VIEW) Door Control Terminal Screws LOCK Lock Button LOCK Light Button Door Control Connections Safety Reversing Sensors Connections Strip wire 7/16" 7/16" (11 mm) Battery Status LED Antenna NOTE: DO NOT connect the power and operate the opener Red White Grey at this time; the trolley will travel to the full open position but To release or insert wire, push in tab with screwdriver tip will not return to the close position until the sensor beam is connected and properly aligned. See Step 12 on page 18. 16
-
 1
1 -
2
-
3
-
4
-
5
-
6
-
7
-
8
-
9
-
10
-
 11
11 -
 12
12 -
 13
13 -
 14
14 -
 15
15 -
 16
16 -
 17
17 -
 18
18 -
 19
19 -
 20
20 -
 21
21 -
22
-
23
-
24
-
25
-
26
-
27
-
28
-
29
-
30
-
31
-
32
-
33
-
34
-
35
-
36
-
37
-
38
-
39
-
40
 |
 |