LiftMaster CSL24V CSL24V Quick Start Guide Manual - Page 1
LiftMaster CSL24V Manual
 |
View all LiftMaster CSL24V manuals
Add to My Manuals
Save this manual to your list of manuals |
Page 1 highlights
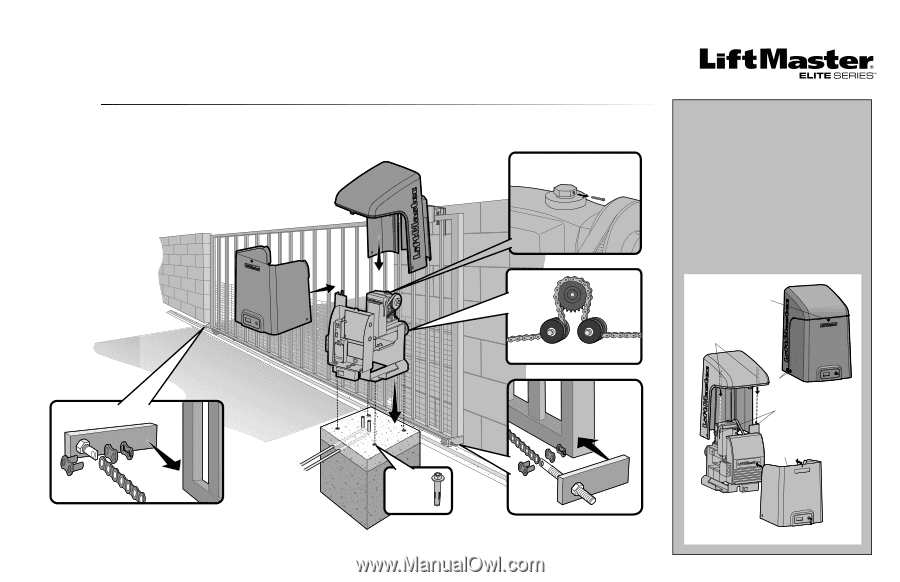
QuickStart for single gate applications This QuickStart is intended to highlight a single right-hand gate application. Each application is unique and it is the responsibility of the purchaser, installer and end user to ensure that the total gate system is installed and operated properly. Refer to the installation manual for complete information regarding installation, testing, and programming. INSTALLATION 1 Install the concrete pad and conduit. 2 Attach the operator to the concrete pad. 3 Attach the gate brackets to the gate. 4 Close the gate. 5 Route the chain through the operator. 7 6 Connect the chain to the gate brackets. 7 Remove the pin from the vent plug on the gear box. 4 MODEL CSL24V™ & CSL24VH™ INSTALL THE COVER 1 Align the tabs on the rear cover with the slots on the chassis and place the cover over the operator. 2 Secure both sides of the rear cover to the chassis with two 5/16-18 hex bolts and washers. 3 Align the front cover with the back cover, making sure the grooves line up. 4 Secure the front cover to the chassis with two 5/16-18 hex bolts and washers. 5 Secure the front cover to the rear cover using the 5/16-18 screw. 3 6 1 2 5 Close the gate BEFORE installing the chain. 3 6 5/16-18 Screw Tabs on Rear Cover 5/16-18 Hex Bolts and Washers Slots on Chassis Groove on Front Cover
-
 1
1 -
 2
2
 |
 |