LiftMaster CSW200UL8 CSW200UL W/ SURGE SUPPRESSION & RADIO RECEIVER Manual - Page 23
Factory Installed DC2000™ connection
 |
View all LiftMaster CSW200UL8 manuals
Add to My Manuals
Save this manual to your list of manuals |
Page 23 highlights
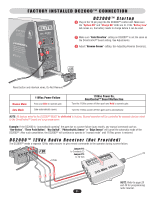
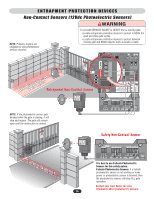
f a c tory in s ta l l e d d c 2 0 0 0 ™ c onne c tion DC 2 0 0 0 ™ S t a r t u p Plug in the 12 pin plug into the DC2000™ control unit. Make sure the "System ON" and "Charge OK" LEDs are lit. If the "Battery Low" led comes on, the battery needs to charge before it can be used. CLASS I, II, III, IV Make sure "Gate Direction" setting on DC2000™ is set the same as the OmniControl™ board setting. See Adjustments. Adjust "Reverse Sensor" setting. See Adjusting Reverse Sensor(s). Socket Reset button and interlock wires, Do Not Remove. Manual Mode Auto Mode 110Vac Power Failure Push and Hold to operate gate. Gate automatically opens. 110Vac Power On, OmniControl™ Board Malfunction Turn the 110Vac power off then push and Hold to operate gate. Turn the 110Vac power off then gate opens automatically. Note: All devices wired to the DC2000™ MUST be dedicated to it alone. Normal operation will be controlled by separate devices wired to the OmniControl™ board and surge suppressor. Example: If the DC2000 is "automatically opening" the gate due to a power failure (auto mode), any manual command such as "One-Button", "Three Push Button", "Key Switch", "Photoelectric Sensor" or "Edge Sensor" will cancel the automatic mode of the DC2000™. After such cancellation, the DC2000™ will continue to operate in "manual mode" until 110Vac power is restored. DC 2 0 0 0 ™ 1 2 V d c R a d i o R e c e i v e r ( N o t P r o v i d e d ) The DC2000™ needs a separate 12Vdc radio receiver to give remote commands to the operator during a power failure. +12Vdc Jumper P2: to Constant (C) Jumper P3: to 12 Volt Note: Refer to page 29 and 30 for programming radio receiver. 21
-
 1
1 -
2
-
3
-
4
-
5
-
6
-
7
-
8
-
9
-
10
-
11
-
12
-
13
-
14
-
15
-
16
-
17
-
 18
18 -
 19
19 -
 20
20 -
 21
21 -
 22
22 -
 23
23 -
 24
24 -
 25
25 -
 26
26 -
 27
27 -
 28
28 -
29
-
30
-
31
-
32
-
33
-
34
-
35
-
36
-
37
-
38
-
39
-
40
-
41
-
42
-
43
-
44
-
45
-
46
-
47
-
48
-
49
-
50
-
51
-
52
-
53
-
54
-
55
-
56
 |
 |
