LiftMaster Dial Code Dial Code Controller Manual - Page 7
Mounting Specifications - 41
 |
View all LiftMaster Dial Code manuals
Add to My Manuals
Save this manual to your list of manuals |
Page 7 highlights
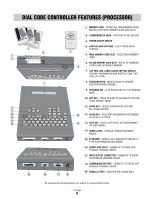
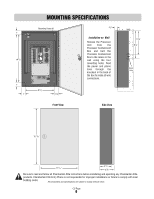
MOUNTING SPECIFICATIONS Mounting Holes (4) 1" 14 1/2" Wire Knock Outs TEL L NE RS 485 1) RS 485 2) RS 485 3) RS 485 4) TIP R NG (+) (-) GND (+) (-) GND (+) (-) GND (+) () GND 12V AC/DC POWER INPUT DOOR NO DOOR NC DOOR C GATE-NO GATE-NC GATE-C VCR NO VCR-C CHASS S GROUND GND INPUT DOOR RELAY GA E RELAY VCR RELAY POSTAL EXIT SW INPUT 1" 1" POWER GATE RELAY DOOR R LAY 8 3/4" 1 1/2" 3/4" Installation on Wall Remove the Processor Unit from the Processor Containment Box and bolt the Processor Containment Box to the recess in the wall using the four mounting holes. Feed the power and phone lines through the knockout in the back of the box to make all wire connections. Front View Side View Wall 6 7/8" 8 1/4" Knock Outs 16 7/16" 11 1/4 " 3 1/4" 41/8 " Be sure to read and follow all Chamberlain Elite instructions before installating and operating any Chamberlain Elite products. Chamberlain Elite Entry Phone is not responsible for improper installations or failure to comply with local building codes. All components and specifications are subject to change without notice. CU Page 6
-
 1
1 -
 2
2 -
 3
3 -
 4
4 -
 5
5 -
 6
6 -
 7
7 -
 8
8 -
 9
9 -
 10
10 -
 11
11 -
 12
12 -
13
-
14
-
15
-
16
-
17
-
18
-
19
-
20
-
21
-
22
-
23
-
24
-
25
-
26
-
27
-
28
-
29
-
30
 |
 |
