LiftMaster J J VERSION 2 LOGIC Manual - Page 18
Diagnostic Mode & Rpm Learn
 |
View all LiftMaster J manuals
Add to My Manuals
Save this manual to your list of manuals |
Page 18 highlights
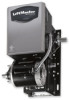
DIAGNOSTIC MODE & RPM LEARN Diagnostic Mode ON Set dip switch to diagnostic mode. The following diagnostic codes are applicable: ON G Obstruction sensed = 2 flashes then pause DIAGNOSTIC G Board Okay = Rapid Flash 1 2 3 4 OFF Factory Memory Preset Activate this mode to initialize the board's memory to the standard factory preset values. Set dip switch to diagnostic mode. Hold learn button down for 5 seconds. Diagnostic LED will go on then turn off when memory is clear. Sets values to the following: Maximum run timer = 90 seconds Timer to close = 0 seconds Mid stop = Disabled Maintenance Alert System = Disabled RPM Learn NOTE: The RPM Learn should never have to be reset except in the case where the Motor or Logic Control board has been replaced and only if the motor doesn't have a start switch. Set unit to any normal mode, B2 is suggested. Begin with the door in the open or closed position. Set the limit switches so the operator can run for at least 5 seconds continuously at a steady speed. Press the open or close button to start the operator. While the operator is running, press the learn button on the board. The diagnostic LED will come on. Hold down the learn button continuously while the operator is running. When the diagnostic LED goes out, the steady-state RPM speed of the operator has been "learned" by the microprocessor. If the unit hits a limit switch, or the motor stops, or you release the button before the LED goes out (about 5 seconds), the RPM learn procedure will have to be repeated. (Refer to figure 1 for RPM Learn button location) FIGURE 1 18
-
 1
1 -
2
-
3
-
4
-
5
-
6
-
7
-
8
-
9
-
10
-
11
-
12
-
 13
13 -
 14
14 -
 15
15 -
 16
16 -
 17
17 -
 18
18 -
 19
19 -
 20
20 -
 21
21 -
 22
22 -
 23
23 -
24
-
25
-
26
-
27
-
28
-
29
-
30
-
31
-
32
 |
 |
