LiftMaster WGB315 User Guide - Page 1
LiftMaster WGB315 Manual
 |
View all LiftMaster WGB315 manuals
Add to My Manuals
Save this manual to your list of manuals |
Page 1 highlights
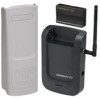
RESS TO R ING WIRELESS GATEBELL KEYPAD LEARN MODEL WGB315 315 MHz Security✚® PRESS MODEL WGB315INDR 315 MHz Security✚® TO R ING MODEL WGB315KYPD 315 MHz Security✚® PRESS TO CARTON INVENTORY R ING PRESS TO R ING Keypad* PRESS TO Remote ControRl†ING Drywall Anchors (2)† PRESS TO RRINecGeiver† PRESS TO Power AdaRptIeNr†G PRESS TO R ING Screws (4)*† * Keypad and 2 Screws provided in model WGB315KYPD. † Remote Control, Receiver, Power Adapter, Drywall Anchors and 2 Screws provided in model WGB315INDR. INSTALLATION • MOUNT RECEIVER TABLETOP MOUNTING 1 LEARN Insert remote control and power adapter into receiver. Plug into outlet. INSTALLATION • MOUNT KEYPAD NOTE: For optimal range performance, mount the receiver to an external wall that is close to the gate operator. DO NOT MOUNT TO METAL. 1 2 Program remote control to the gate operator radio receiver. Refer to your gate operator manual for programming instructions. 3 Lift PRESS TO R ING P R R ESS ITNO G PRESS TO R ING Remove foam spacer on underside of keypad cover. Check range before installing. Using two people, hold the keypad and receiver in the desired locations. Make sure the keypad rings the gatebell when pressed. If no chime is heard, repeat test using a new location for the receiver. 4 KEYPAD MOUNTING (For reference only) Bottom Mounting Hole Battery Battery Cover Remove battery cover and battery. Determine location for keypad. Mark the bottom mounting hole. 5 LEARN Top Mounting Hole For the top mounting screw, mark 4 1/4" (10.8 cm) up the centerline from the bottom of the keypad. Drill 1/8" pilot holes for top and bottom screws. See keypad mounting reference. 6 LEARN 4 1/4" (10.8 cm) LEARN LEARN LEA LEARN LEARN Install top mounting screw, allowing 1/8" (3.2 mm) to protrude above surface. Position keypad on screw head and adjust for snug fit. LEARN LEARN LEARN LEARN Secure keypad with bottom screw, using care to avoid cracking plastic housing. Reinstall batLtEeARrNy and slide battery cover up and snap it into place. Close cover. LEARN LEARN LEARN LEARN LEARN L LEARN
-
 1
1 -
 2
2
 |
 |
