Linksys BEFN2PS4 User Guide - Page 10
Subnet Mask, Default Gateway Address - default password
 |
UPC - 745883549931
View all Linksys BEFN2PS4 manuals
Add to My Manuals
Save this manual to your list of manuals |
Page 10 highlights
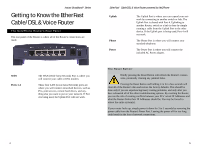
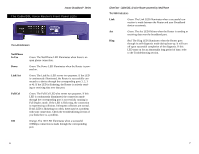
Instant BroadbandTM Series 2. A username and password prompt will appear. Leave the User Name box empty and type admin (the default password) in the Password box. Click OK. 3. The Cable/DSL Voice Router's Setup page will appear. Note: The Setup page shown in this graphic may differ from the one seen on your router. EtherFast® Cable/DSL & Voice Router powered by Net2Phone 4. Configure the following values. Note: All of this information should be readily available from your ISP. Host Name & Domain Name These fields allow you to supply a host and domain name for the Router. Some ISPs require these names as identification. You may have to check with your ISP to see if your Broadband Internet service has been configured with a host and domain name. In most cases, leaving these fields blank will work. LAN IP Address These values refer to your internal network settings. Unless you have specific internal needs, there should be no reason to change these values. For the internal LAN, the default values are as fol- lows. • Private IP Address: 192.168.1.1 • Subnet Mask: 255.255.255.0 WAN IP Address These values refer to the outside network you connect to every time you access your Broadband Internet connection. Most Broadband ISPs assign their clients with a different IP address each time they log on. If this is the case with your ISP, click Obtain an IP Address Automatically and continue to step 5. If your ISP assigns you a fixed IP address, click Specify an IP Address and enter the address into the Subnet Mask, Default Gateway Address and DNS fields provided by the ISP. PPPoE (Point-to-Point Protocol over Ethernet) Some DSL-based ISPs use PPPoE to establish communications with an end-user. If you are using a DSL line, check with your ISP to see if they use PPPoE. If they do use PPPoE, you must enable it. If you do enable PPPoE, remember to remove any existing PPPoE applications already on any of your PCs. To enable PPPoE: 1. Click on the Enable option in the PPPoE section of the Setup screen. 2. Enter the User Name you use to log on to your Internet connection. 3. Enter your corresponding Password. 14 15
-
 1
1 -
2
-
3
-
4
-
 5
5 -
 6
6 -
 7
7 -
 8
8 -
 9
9 -
 10
10 -
 11
11 -
 12
12 -
 13
13 -
 14
14 -
 15
15 -
16
-
17
-
18
-
19
-
20
-
21
-
22
-
23
-
24
-
25
-
26
-
27
-
28
-
29
-
30
-
31
 |
 |
