Linksys FENSK05 User Guide - Page 13
Cancel, Delete
 |
UPC - 745883549245
View all Linksys FENSK05 manuals
Add to My Manuals
Save this manual to your list of manuals |
Page 13 highlights
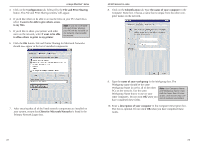
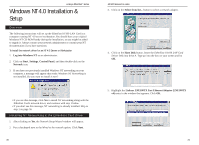
Linksys EtherFast® Series Under no circumstance are you to click Cancel or Delete! • If your PC asks for the Linksys Setup or Driver Disk 1. Click OK. 2. Ensure that the Driver Disk is in your PC's flop- py drive. 3. Type "a:\" in the "Copy files from:" box. 4. Click OK. • If you are asked to supply your Windows 95 Installation Files or Disks 1. Click OK. 2. If you have a Windows 95 CD-ROM, type "d:\win95" in the "Copy files from:" box, where "d:" is your CD-ROM drive. 3. If you don't have a Windows 95 CD-ROM, type: "c:\windows\options\cabs". 4. Click OK. • If you are asked for a file that includes "LNE100TX" in its name 1. Insert the Driver Disk into your PC's floppy drive. 2. Type "a:\" in the "Copy files from:" box. 3. Click OK • If you receive a Version Conflict error 1. Choose to keep the newest version of the file by clicking Yes. 4. When asked if you want to restart your PC, remove the Driver Disk and click Yes. If you are using the Windows CD-ROM, leave it in your PC. You may need it later. 10/100 Network In a Box Network Component Configuration 1. Once you are back at the Windows 95 desktop, click on your taskbar's Start button, then Settings, then Control Panel, and then double-click the Network icon. 2. The Network window will appear. Click on the Configuration tab. A window similar to the one below will appear. There may be other compo- nents listed in addition to the ones shown below (for example, Client for Microsoft Networks), which is normal. If any of the components shown below are missing, however, you'll need to manually install them. If that's Note: If you need to install the TCP/IP Protocol, contact your system administrator or ISP, or refer to the Windows 95 documenta- the case, refer to Manually Installing the Network Components on page 59 now. • Client for Microsoft Networks • Linksys LNE100TX Fast Ethernet Adapter tion. If DHCP error messages appear during boot up, this is a TCP/IP error. Linksys does not provide technical support for the (LNE100TX v4) • IPX/SPX-compatible Protocol • NetBEUI configuration or troubleshooting of the TCP/IP protocol. • TCP/IP 5. If Windows does not ask you to restart your PC, remove the Driver Disk click the Start button, choose Shut Down, choose Restart, then click Yes. The Windows 95 Version B driver installation is complete. Please continue on to the next section, which will provide instructions for configuring Windows 95's network protocol. Consult your network administrator for network configuration information if necessary. Note: From this point on, you must provide Windows with a User name and Password every time you are prompted to do so. Remember to click OK to properly log into Windows. If you click Cancel or hit the Escape (ESC) key, you will not log into the network. 20 21
-
 1
1 -
2
-
3
-
4
-
5
-
6
-
7
-
 8
8 -
 9
9 -
 10
10 -
 11
11 -
 12
12 -
 13
13 -
 14
14 -
 15
15 -
 16
16 -
 17
17 -
 18
18 -
19
-
20
-
21
-
22
-
23
-
24
-
25
-
26
-
27
-
28
-
29
-
30
-
31
-
32
-
33
-
34
-
35
-
36
-
37
-
38
-
39
 |
 |
