Linksys PCMPC200 User Guide - Page 15
Windows NT 4.0 Installation and, Setup - pcm200
 |
UPC - 745883548422
View all Linksys PCMPC200 manuals
Add to My Manuals
Save this manual to your list of manuals |
Page 15 highlights
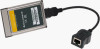
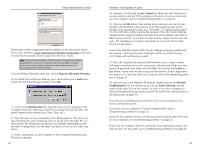
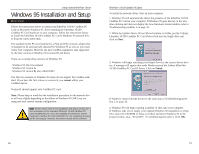
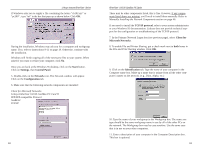
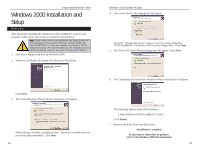
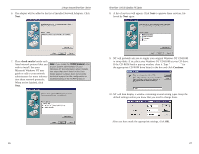
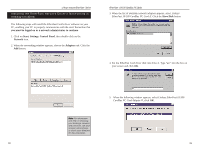
Linksys Instant EtherFast® Series Windows NT 4.0 Installation and Setup Overview The following instructions will set up an NT 4.0 server/workstation on your PC. You should have your original Windows NT CD-ROM handy during the installation, as you might be asked to supply it. Note: Screen shots used in this Installation and Setup section are from installation of the standard EtherFast 10/100 CardBus PC Card (PCMPC200 v2). If you are installing the EtherFast 10/100 Integrated CardBus PC Card (PCM200 v2), the installation process will be unchanged, however, the product name will be different. To install the network driver for an NT 4.0 Server or Workstation 1. Log into Windows NT as a network administrator. 2. Click on Start, Settings, Control Panel, and then double-click on the Network icon. 3. If you have not previously installed Windows NT networking on your computer, a message will appear that reads: Windows NT Networking is not installed. Do you want to install it now? • If you see this message, click Yes to install NT networking along with the EtherFast Card's network driver, and continue with step 1 below. • If you don't see this message, NT networking is already installed. Skip to step 1 on page 30. Installing NT Networking & the EtherFast Card Driver 1. After clicking on Yes, the Network Setup Wizard window will appear. 2. Put a checkmark next to the Wired to the network option. Click Next. 24 EtherFast® 10/100 CardBus PC Cards 3. Click on the Select from list... button to select a network adapter. 4. Select the EtherFast 10/100 CardBusPC Card II, click on the Have Disk button. Insert the Driver Disk into the floppy drive. Type "a:\" into the box on your screen and hit OK. 5. When the following window appears, select Linksys EtherFast 10/100 CardBus PC Card Adapter II, click OK. 25
-
 1
1 -
2
-
3
-
4
-
5
-
6
-
7
-
8
-
9
-
 10
10 -
 11
11 -
 12
12 -
 13
13 -
 14
14 -
 15
15 -
 16
16 -
 17
17 -
 18
18 -
 19
19 -
 20
20 -
21
-
22
-
23
-
24
-
25
-
26
-
27
-
28
-
29
 |
 |