Linksys SRW224P Cisco SRW224P 24-Port 10/100 + 2-Port Gigabit Switch with WebV - Page 16
Hardware Installation, Placement Options - 24 poe
 |
UPC - 745883566068
View all Linksys SRW224P manuals
Add to My Manuals
Save this manual to your list of manuals |
Page 16 highlights
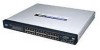
24-Port 10/100 + 2-Port Gigabit Switch with Webview and Power over Ethernet Hardware Installation To connect network devices to the Switch, follow these instructions: 1. Make sure all the devices you will connect to the Switch are powered off. 2. Connect a Category 5 Ethernet network cable to one of the numbered ports on the Switch. 3. Connect the other end to a PC or other network device. 4. Repeat steps 2 and 3 to connect additional devices. If 802.3af-compliant PoE devices are connected to the Switch's 10/100 ports, the Switch automatically supplies the required power. 5. If you are using the Gigabit port, connect a Category 5e Ethernet network cable to the Gigabit port on the Switch, and connect the other end to a Gigabit server or other network device. 6. If you are using a mini-GBIC port, then connect a mini-GBIC module to the mini-GBIC port. For detailed instructions, refer to the module's documentation. 7. Connect the supplied power cord to the Switch's power port, and plug the other end into an electrical outlet. When connecting power, always use a surge protector. 8. Power on the devices connected to the Switch. Each active port's corresponding LED will light up on the Switch. Placement Options There are two ways to physically install the Switch, either set the Switch on its four rubber feet for desktop placement or mount the Switch in a standard-sized, 19-inch high rack for rack-mount placement. Desktop Placement 1. Attach the rubber feet to the recessed areas on the bottom of the Switch. 2. Place the Switch on a desktop near an AC power source. 3. Keep enough ventilation space for the Switch and check the environmental restrictions mentioned in Appendix D: Specifications as you are placing the Switch. 4. Connect the Switch to network devices according to the Hardware Installation instructions above. Chapter 3: Connecting the Switch Hardware Installation IMPORTANT: Make sure to use the power cord that is supplied with the Switch. Use of a different power cord could damage the Switch. NOTE: If you need to reset the Switch, remove the power cord from the back of the Switch and then reconnect it. Figure 3-2: Attaching the Switch's Rubber Feet 8
-
 1
1 -
2
-
3
-
4
-
5
-
6
-
7
-
8
-
9
-
10
-
 11
11 -
 12
12 -
 13
13 -
 14
14 -
 15
15 -
 16
16 -
 17
17 -
 18
18 -
 19
19 -
 20
20 -
 21
21 -
22
-
23
-
24
-
25
-
26
-
27
-
28
-
29
-
30
-
31
-
32
-
33
-
34
-
35
-
36
-
37
-
38
-
39
-
40
-
41
-
42
-
43
-
44
-
45
-
46
-
47
-
48
-
49
-
50
-
51
-
52
-
53
-
54
-
55
-
56
-
57
-
58
-
59
-
60
-
61
-
62
-
63
-
64
-
65
-
66
-
67
-
68
-
69
-
70
-
71
-
72
-
73
-
74
-
75
-
76
-
77
-
78
-
79
-
80
-
81
-
82
-
83
-
84
-
85
-
86
-
87
-
88
-
89
-
90
-
91
-
92
-
93
-
94
-
95
-
96
-
97
-
98
-
99
-
100
-
101
-
102
-
103
-
104
 |
 |
