Linksys WVC200 Cisco WVC200 2.4 GHz Wireless-G PTZ Internet Camera with Audio
Linksys WVC200 - Wireless-G PTZ Internet Camera Manual
 |
UPC - 745883569045
View all Linksys WVC200 manuals
Add to My Manuals
Save this manual to your list of manuals |
Linksys WVC200 manual content summary:
- Linksys WVC200 | Cisco WVC200 2.4 GHz Wireless-G PTZ Internet Camera with Audio - Page 1
• Power Adapter • Ethernet Network Cable • Setup CD-ROM with on-screen User Guide • SoloLink DDNS Free Trial Card • Registration Card Wireless-G D G PTZ Internet Camera with Audio Quick Installation Model WVC200 H In the Selection box, select the Camera you're installing, write down the IP - Linksys WVC200 | Cisco WVC200 2.4 GHz Wireless-G PTZ Internet Camera with Audio - Page 2
is complete. You can relocate the Camera after you install the Utility and/or the SoloLink service. R For additional information or troubleshooting help, refer to the User Guide on the Setup Wizard CD-ROM. You can also e-mail for further support. 24 Hour Technical Support 800-326-7114 (toll-free
-
 1
1 -
 2
2
 |
 |

Wireless-
G
PTZ Internet Camera
with Audio
Quick Installation
Model
WVC200
A
Insert the Setup CD-ROM into your CD
or DVD drive. You see a screen like
this one. If it doesn’t appear
automatically, click the
Start
button,
choose
Run
, type
D:\wvc200.exe
in
the
Open
field (where “D” is the drive
letter of your CD or DVD drive), then
click
OK
.
B
Click the
Click here to Start
button.
C
Read and agree to the license
agreement, then click
Next
.
D
Connect the included Ethernet
network cable to your network
router or switch, then click
Next
.
B
C
D
E
Connect the other end of the cable to
the Camera’s ETHERNET port, then
click
Next
.
F
Connect the included power adapter
to the Camera’s POWER port, plug the
other end into a standard electrical
outlet, then click
Next
.
G
Make sure that the Camera’s LEDs
are lit, then click
Next
.
E
F
G
H
In the
Selection
box, select the
Camera you’re installing, write down
the IP address of the Camera, so you
can access the Web-based utility
later, then click
Next
. If the Camera
you want is not displayed in the
Selection
box, click
Search Again
.
I
For increased network security,
type
admin
, in lowercase letters,
in the
Administrator Name
and
Administrator Password
fields,
then click
OK
. (You can change
the administrator name and
administrator password using the
Camera’s Web-based Utility later.)
J
On the
Basic Settings
screen, change
the following settings:
•
Camera Name:
Enter a unique
name, up to 15 characters, for the
Camera. Unique names are helpful
when you are using multiple
Cameras on the same network.
•
Description:
Enter a description,
up to 32 characters, with additional
information, such as the location,
for the Camera.
•
Time Zone:
Select the time
zone that corresponds with
the Camera’s location.
•
Date:
Enter the current date in the
provided fields.
•
Time:
Enter the current time in the
provided fields.
When you have finished making
changes, click
Next
.
H
I
J
1
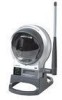
Package Contents
•
Wireless-G PTZ Internet Camera with Audio
•
Power Adapter
•
Ethernet Network Cable
•
Setup CD-ROM with on-screen User Guide
•
SoloLink DDNS Free Trial Card
•
Registration Card
Set up the Wireless-G PTZ Internet Camera
with Audio