Linksys WVC54GC User Guide - Page 28
Wall Mount Option - viewer
 |
UPC - 745883566754
View all Linksys WVC54GC manuals
Add to My Manuals
Save this manual to your list of manuals |
Page 28 highlights
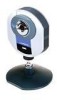
Compact Wireless-G Internet Video Camera Wall Mount Option You will use the Camera's stand to mount the Camera on a wall. Its stand has two wall-mount slots that are spaced 58 mm (2.28 inches) apart. 1. Insert the screw end of the stand into the hole on the back panel. 2. Tighten the screw end and then the gray thumbscrew. 3. Determine where you want to mount the Camera. Attach two screws to the wall, so that the Camera's wallmount slots line up with the two screws. 4. Maneuver the Camera so the screws are inserted into the two slots. 5. Adjust the tilt of its head accordingly. The installation of the Compact Wireless-G Internet Video Camera is complete. Go to "Chapter 6: Installing the Compact Wireless-G Internet Video Camera Multi-Camera Viewer & Recorder Utility." If advanced users wish to access the Camera through its Web-based Utility, then proceed to "Chapter 8: Using the Compact Wireless-G Internet Video Camera Web-based Utility." Figure 5-21: Wall Mount Option Figure 5-22: Camera in Wall-Mounting Position 58 mm (2.28 inches) Chapter 5: Setting up and Mounting the Compact Wireless-G Internet Video Camera Placement Options Figure 5-23: Wall-Mount Slots 20
-
 1
1 -
2
-
3
-
4
-
5
-
6
-
7
-
8
-
9
-
10
-
11
-
12
-
13
-
14
-
15
-
16
-
17
-
18
-
19
-
20
-
21
-
22
-
 23
23 -
 24
24 -
 25
25 -
 26
26 -
 27
27 -
 28
28 -
 29
29 -
 30
30 -
 31
31 -
 32
32 -
 33
33 -
34
-
35
-
36
-
37
-
38
-
39
-
40
-
41
-
42
-
43
-
44
-
45
-
46
-
47
-
48
-
49
-
50
-
51
-
52
-
53
-
54
-
55
-
56
-
57
-
58
-
59
-
60
-
61
-
62
-
63
-
64
-
65
-
66
-
67
-
68
-
69
-
70
-
71
-
72
-
73
-
74
-
75
-
76
-
77
-
78
-
79
-
80
-
81
-
82
-
83
-
84
-
85
-
86
-
87
-
88
-
89
-
90
-
91
 |
 |
