Logitech 9700730403 Manual - Page 3
Setup, Setup and Operation - speaker system
 |
UPC - 097855013095
View all Logitech 9700730403 manuals
Add to My Manuals
Save this manual to your list of manuals |
Page 3 highlights
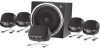
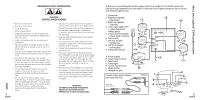
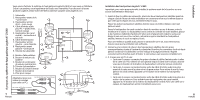
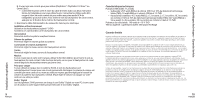
Setup Setting up your Logitech® Z-640 speakers Important: For your safety, set up the system before plugging it into a power source. 1. Before attaching the cables to the subwoofer, position the two front satellite speakers on either side of your computer monitor about the same distance from each other as from you. Angle them to face you. Place the other satellite speakers behind you and about the same distance apart as the front speakers. Position the center channel speaker on top of your monitor or on your desk in between your monitor and keyboard. This speaker is the control center for your system, so you will want to place it within easy reach. Depending on where you place it, adjust the stand to direct the sound toward you. To adjust stand, remove screw holding it to satellite, reverse stand, and replace screw. For best sound quality, place the subwoofer on the floor beneath your desk. Be sure to allow for adequate ventilation around it. 2. Insert the colored plug from each satellite speaker into the corresponding colored jacks on the back of the subwoofer. Connect the d-sub plug from the center speaker to the subwoofer as shown on the previous page. Carefully align the pins before inserting the plug, and screw down the connector. 3. A. If you have a PC and a: • 6-channel sound card: Connect the colored plugs from the audio input cable to the color-coded jacks on the sound card. To hear optimal sound from your 6channel sound card, make sure the Matrix button on the center speaker control is not depressed. • 4-channel sound card: Connect the green plug from the audio input cable to the front jack and the black plug into your sound card's rear jack. To enable sound from the center channel speaker, depress the Matrix button on the center speaker. • 2-channel sound card: Connect the green plug from the audio input cable to the "line out" jack on your sound card. To enable sound from the center channel speaker, depress the Matrix button on the center speaker. With a 2-channel sound card, you will not hear sound from the rear speakers. 3 English B. If you have a video game console (PlayStation®, PlayStation®2, Xbox™, or GameCube®): • Connect the green and black plugs from the audio input cable to the 2 stereo mini jacks on the included video game adapter. Connect the red and white RCA audio cables from your video game console to the RCA audio jacks to the video game adapter. To enable sound from the center channel speaker, depress the Matrix button on the center speaker. 4. Plug the subwoofer's power cord into an electrical outlet. Enjoying your Logitech® Z-640 speakers Access these controls on the center channel speaker: Power Turns the system power on and off. System Volume Adjusts the overall system volume. Fader Adjusts the volume level of the rear speakers. Center Adjusts the volume level of the center speaker. Matrix If you do not have a 6-channel sound card, use the Matrix feature to provide a soundtrack for the center channel speaker. This feature creates sound for the center channel speaker from the front left and right speakers. Headphone Jack When headphones are used with your Z-640 system, the speakers will mute automatically for private listening. Note: The volume of your headphones is controlled by your sound card or video game and cannot be adjusted by the system volume knob on the center speaker. Instead, adjust the headphone volume on your sound card or video game. Dolby® Digital The Z-640 speakers support Dolby® Digital sound on your PC if your 6-channel sound card or DVD software can decode a Dolby® Digital soundtrack. 4 English Setup and Operation
-
 1
1 -
 2
2 -
 3
3 -
 4
4 -
 5
5 -
 6
6 -
 7
7 -
 8
8 -
 9
9 -
10
 |
 |