Logitech Alert B700i Setup Guide - Page 2
Choose Your Camera Location - alert b700e
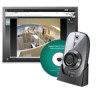 |
View all Logitech Alert B700i manuals
Add to My Manuals
Save this manual to your list of manuals |
Page 2 highlights
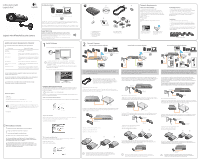
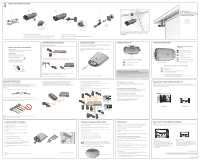
3 Choose Your Camera Location 1 2a 2b 3 ball joint tighten clockwise On a post, on a wall, or under an eave The wall mount allows you to easily fasten your camera to a ceiling, wall, or flat surface. 1) Start by pre-drilling holes into the wall and screwing in the mounting base. wall mount clamp tighten clockwise 2a) Thread the ball joint into the camera. 2b) Place the ball joint end into the wall mount clamp and tighten, using the wing nut. 3) Attach the camera to the mounting arm. mounting arm (optional) Where can I find more information? Commander Help You can press the F1 key from any screen in the Alert Commander Software to access the online Help system. Knowledge Base Troubleshooting and FAQs are available at www.logitech.com/alert/business-support Customer Support Hotline Call 1 866-585-2877 (North America) Camera Warranty and Use Cautions Refer to System Requirements Guide. Quick-start guide LogitechAlert™ B700i PoE Security Camera System Requirements & Support Guide Troubleshooting Camera Connections What if camera/video disappears? 1) (If using configuration #1) Verify that the connections from the camera to the PoE switch are secure. PoE Switch B700i & B700e PoE Security Cameras 2) (If using configuration #2 or #3) Verify that the connections from the camera to the PoE dongle/midspan and the dongle/midspan to the standard switch are secure. PoE dongle/ midspan B700e PoE Camera Standard Switch PoE dongle/ midspan 3) Check firewall settings or press the F1 key in Commander Software for additional help. 4) Go to Settings > Cameras > Add/Find > Find Cameras. 5) Reset the camera. See instructions in "Camera Reset Instructions." Camera Reset Instructions Gently insert a paper clip into the reset hole located under the hatch of the camera and carefully feel for the tactile rubber button. Gently press for 5 seconds and then release and pull the paper clip from the hole. Resetting the camera will restore the camera to factory settings. If the camera does not appear after this, go to Settings > Cameras > Add/Find > Find Cameras. Note: it will not delete video recorded on the microSD card. Frequently Asked Questions What do I do if the cable is too short? Logitech Alert products include Ethernet CAT5e cables that have been specially designed to maintain the weather seal on our outdoor camera. For longer CAT5e cables: 1) Purchase longer 50-ft or 100-ft Ethernet CAT5e cables from Logitech.com > Security > Other Accessories. 2) Use the cable extender (provided) to connect two cables together. What dongle/midspan is required for Alert B700e PoE camera? The midspan needs to have two RJ-45 ports: one RJ-45 data input and one data/power RJ-45 output connector port. Also, the proper midspan device will tap the unused wire pairs 4/5 and 7/8 to carry power, while data runs on the other wire pairs. Standard Switch Can I have more than one system per site? There is a 6 camera limit per monitoring workstation. To install more than one 6 camera system per location: 1) On system 1, install PC Commander software on PC #1. 2) Connect up to 6 cameras. 3) Assign system 1 a password by going to Settings > Security and Web Account > Advanced. 4) Follow steps 1-3 on a different PC to add additional cameras. The maximum allowable cable length is 100 meters or 325 feet (based on PoE standards). However, if you are using aftermarket cables or cables that you have built yourself, the cables must be the standard RJ45 without strain relief (22mm x 12 mm). data & power port data input port PoE cameras for Commander #1 Alert Commander #1 Mount the B700e PoE camera from a false ceiling using the t-bar mount. Reading the Motion LED Motion LED How do I know the camera is recording? Camera is ready to record (Red) Camera is recording (Red blinking) How do I turn Off Motion and Diagnostic LEDs You can turn off the motion and diagnostic LEDs in the Settings > Cameras > (Camera name) > Show LED for.... Remove checkmark from "Motion" checkbox. See F1 Help for instructions. Can I change the lens on the camera? No. The B700e PoE camera has a stationary wide-angle 130 ° lens. You can, however, pan and zoom digitally with the Commander and Web Commander software. Does the camera have a built in web server? No, the camera is designed to be managed through the Commander software as well as Web and Mobile Viewer and Web and Mobile Commander. Does the camera support two way audio? No, the camera is equipped with a microphone for high quality listen in and recording capability. It does not have a speaker for two-way communication. Want to see more frequently asked questions? Visit www.logitech.com/alert/business-support. ! Note: The cable extender is not waterproof and should only be used when it is located away from water or moisture. Using the microSD™ card adapter NOTE: Unplug the B700e camera before removing, replacing, or upgrading your microSD card. To review the video on the microSD card, we recommend you use Logitech Alert Commander. To review the video on the microSD card without Logitech Alert 1 Commander: 1) Open the hatch on the bottom of the camera and remove the microSD card from its port. 2) Plug the microSD card into the adapter. 3) Plug the adapter into the PC's SD card slot. • View video recordings using the free Apple QuickTime player or other player that supports H.264 video playback. (To download QuickTime, visit http://www.apple.com/quicktime/download/) • The B700e PoE camera supports SDHC compliant microSD cards up to 32 GB in size. ! microSD card must be installed in the camera for recording to occur. 2 3 COMSMPAACRTTMFLEADSIAH I/II MMC/SD MS/MS PRO microSD Logo is a trademark of SD-3C, LLC. Alert Commander #2 PoE cameras for Commander #2 Turning on the Camera's Audio Function The B700e PoE camera has a built-in microphone to record audio for regions where audio is legally permitted. By default, audio recording function for the B700e PoE camera is turned off. To turn on audio so that the camera will record sound, follow these instructions: 1) Go to Settings > Cameras. 2) Select the camera you want to turn audio on. 3) In the Basic section, locate the Enable Audio option. 4) Click in the open field so that a check mark displays. Before audio will turn on, you must accept a disclaimer: Audio monitoring and recording is included. However, depending on where your cameras are installed, the use of recording devices may be prohibited. Be sure to comply with the laws in your country/state/locality when using Logitech Alert products and services. 5) Accept the message. The camera will begin recording audio. Camera microphone Enabling Alerts You can set up alerts that will automatically send notifications to your e-mail address and mobile phone whenever a camera detects motion, keeping you informed. 1) In Commander, click on the Settings icon and open the Alerts tab. 2) Click on E-mail settings. 3) In the Basic section, you will see that all of your cameras are listed next to a checkbox. 4) Clicking in the checkbox (so that a check mark displays) turns on the function of sending out e-mail alerts. Adding the e-mail address and/or mobile phone number: 1) Under the section called "Send e-mail alerts to the following recipients", click the "Add More >" link. The Add Recipient dialog displays. 2) Enter the name of the owner (who will receive the alerts) in the "Recipient name" field. 3) Type the new recipient's e-mail address. 4) In the "Type of message" drop-down section, select from the available options: text, snapshot, or mobile phone optimized. 5) Test that the e-mail account is valid by clicking the "Send test message" option. 6) Click OK to accept the settings. You're all ready to go. Advanced options • Limit the number of alerts sent to your email by changing the Alert Frequency setting. The default is set to 5 minutes between alerts. • Specify the amount of continuous motion (in seconds) before the camera sends an alert. The default setting is 2 seconds. RECOMMENDATION: Mount the B700e PoE camera under an eave or other overhang so that it is not exposed to direct sunlight. ! Reading the Diagnostic LEDs Camera Diagnostic LED Which LED colors indicate "camera is working"? Connected to Internet (Green) Connected to Alert Commander (Purple) Connected to Alert Commander & Internet (Blue) Upgrading Firmware (White) Camera in standalone mode (Yellow) Not connected to Alert Commander or Internet (Light blue) Which LED colors indicate "camera is not working"? Camera boot-up failed * (Red blinking) MicroSD card read/write test failed - No MicroSD card ** (Alternating Red/Yellow blinking) * See "Camera Reset Instructions" for assistance. ** Format the microSD Card. In Commander, go to Settings > Storage > Cameras. Select your camera and click the "Format" link. Logitech Alert™ Web and Mobile Viewing (Free) The Alert B700e PoE camera includes free remote viewing that allows you to see live video from your cameras. Just log in to http://alert.logitech.com from Internet-connected computers or download the Logitech Alert Mobile Viewer app for iOS, Android™, or BlackBerry® smartphones. Web Viewer Mobile Viewer Logitech Alert™ Web and Mobile Commander When you add our Web and Mobile Commander services, you get the power and freedom to manage your Logitech Alert system from your smart phone or over the web. Web Commander Web Commander turns any Internet-connected computer into a control center for your camreas. Your paid subscription lets you manage your cameras, review your recorded video, and get notices of system status. Visit http://alert.logitech.com for subscription information. Subscription includes Mobile Commander. Free trial available. Mobile Commander When you can't be at a computer, you can check your cameras from an iOS, Android™, or BlackBerry® phones using Mobile Commander. Visit http://alert.logitech.com for subscription information. Subscription includes Web Commander. Free trial available. www.logitech.com © 2011 Logitech. All rights reserved. Logitech, the Logitech logo, and other Logitech marks are owned by Logitech and may be registered. All other trademarks are the property of their respective owners. Logitech assumes no responsibility for any errors that may appear in this manual. Information contained herein is subject to change without notice. 620-003369 rev003
-
 1
1 -
 2
2
 |
 |
