Logitech C920 Getting Started Guide - Page 4
Using your webcam with Windows 8 - webcam software
 |
View all Logitech C920 manuals
Add to My Manuals
Save this manual to your list of manuals |
Page 4 highlights
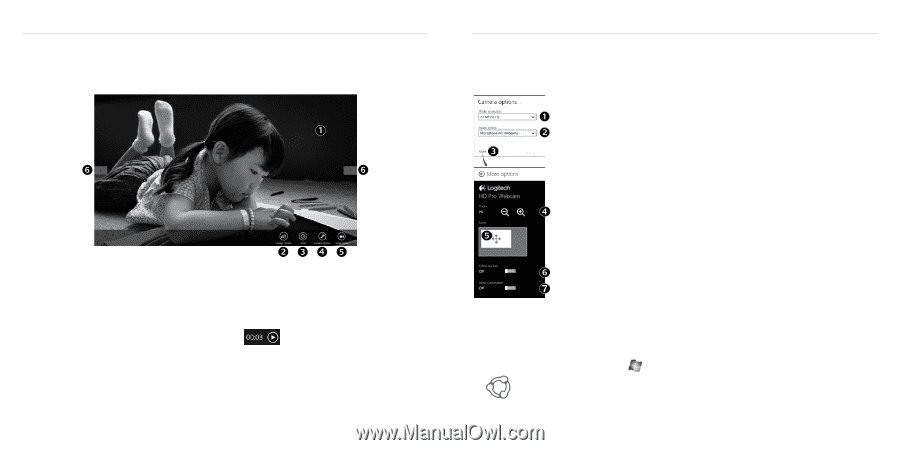
Getting started with Using your webcam with Windows 8 Use the Camera app, available from the Windows 8 Start screen, to operate and control your webcam. Understanding the Camera app 1. Preview window. Click or tap to capture photos or videos (depending on whether Video Mode is selected). 2. Change webcams (when you have more than one). The face of your Logitech webcam illuminates when selected. 3. Adjust your camera settings. 4. Activate or deactivate the Timer feature. When activated, there is a three second countdown to capturing a photo or video. 5. Turn Video Mode on (to record videos) or off (to take photos). 6. Click or tap on the arrows to scroll through the photos and videos you have captured. Videos are denoted by a timer and play button in the bottom right-hand corner: Tip: The Camera app lets you use your webcam's most popular features quickly and easily. If you want to take advantage of the enhanced features your webcam offers, such as motion detection, use the Logitech Webcam Software available from logitech.com/downloads. 6 English Logitech® HD Pro Webcam C920 Adjusting your Camera settings The Logitech software optimizes the settings for your environment automatically. To adjust any of your settings choose Camera options. This is available from the Camera app (see the previous page) and from within Metro apps that support webcams. Choose your required resolution for photo capture, or video capture when in Video Mode. 1. Choose the microphone you want to use to record sound in your videos, if you have more than one available. 2. Access More Options, to benefit from enhanced features such as digital Zoom and Move. 3. If the More Options pane doesn't show the Logitech logo and offer enhanced options, it is likely that the Logitech software didn't install correctly when you first connected your camera. To reinstall it, go to the Windows Store and look for Logitech Camera Controller. 4. Zoom in or out to include/exclude your surroundings. 5. Having zoomed in, drag the white box to pan (adjust the focus area of your webcam). 6. Use Follow my face so you're always in the picture. 7. Enjoy clear conversations without annoying background noise. Depending on the features available with your camera, you can access further advanced settings by scrolling. Sharing your photos and videos You can share your photos and videos via e-mail, Twitter, Facebook®, YouTube®, or Microsoft SkyDrive®. Follow these steps: 1. In the Camera app, scroll to the photo or video you want to share. 2. Select Share in the Charms bar (or press - H): 3. Choose the media through which you want to share the photo or video. English 7
-
 1
1 -
 2
2 -
 3
3 -
 4
4 -
 5
5 -
 6
6 -
 7
7 -
 8
8 -
 9
9 -
 10
10 -
11
-
12
-
13
-
14
-
15
-
16
-
17
-
18
-
19
 |
 |