MSI 975X PLATINUM User Guide - Page 102
RAID Migration Instructions - bios upgrade
 |
UPC - 816909035759
View all MSI 975X PLATINUM manuals
Add to My Manuals
Save this manual to your list of manuals |
Page 102 highlights
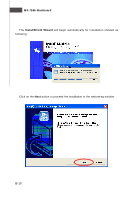
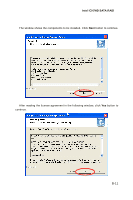
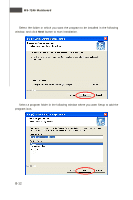
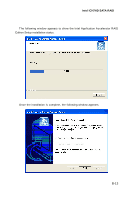
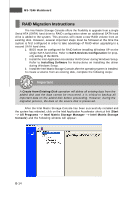
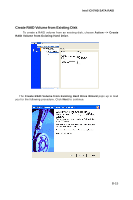
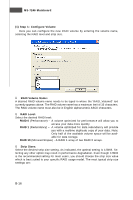
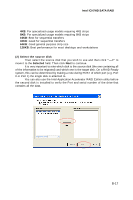
MS-7246 Mainboard RAID Migration Instructions The Intel Matrix Storage Console offers the flexibility to upgrade from a single Serial ATA (SATA) hard drive to RAID configuration when an additional SATA hard drive is added to the system. This process will create a new RAID volume from an existing disk. However, several important steps must be followed at the time the system is first configured in order to take advantage of RAID when upgrading to a second SATA hard drive: 1. BIOS must be configured for RAID before installing W indows XP on the single SATA hard drive. Refer to SATA Devices Configuration for properly setting of the BIOS. 2. Install the Intel Application Accelerator RAID Driver during W indows Setup. Refer to Installing Software for instructions on installing the driver during W indows Setup. 3. Install the Intel Matrix Storage Console after the operating system is installed. To create a volume from an existing disk, complete the following steps: Important A Create from Existing Disk operation will delete all existing data from the added disk and the data cannot be recovered. It is critical to backup all important data on the added disk before proceeding. However, during the migration process, the data on the source disk is preserved. After the Intel Matrix Storage Console has been successfully installed and the system has rebooted, click on the Intel Application Accelerator shortcut link (Start --> All Programs --> Intel M atrix Storage M anager --> Intel Matrix Storage Console) and the following window will appear: B-14
-
 1
1 -
2
-
3
-
4
-
5
-
6
-
7
-
8
-
9
-
10
-
11
-
12
-
13
-
14
-
15
-
16
-
17
-
18
-
19
-
20
-
21
-
22
-
23
-
24
-
25
-
26
-
27
-
28
-
29
-
30
-
31
-
32
-
33
-
34
-
35
-
36
-
37
-
38
-
39
-
40
-
41
-
42
-
43
-
44
-
45
-
46
-
47
-
48
-
49
-
50
-
51
-
52
-
53
-
54
-
55
-
56
-
57
-
58
-
59
-
60
-
61
-
62
-
63
-
64
-
65
-
66
-
67
-
68
-
69
-
70
-
71
-
72
-
73
-
74
-
75
-
76
-
77
-
78
-
79
-
80
-
81
-
82
-
83
-
84
-
85
-
86
-
87
-
88
-
89
-
90
-
91
-
92
-
93
-
94
-
95
-
96
-
 97
97 -
 98
98 -
 99
99 -
 100
100 -
 101
101 -
 102
102 -
 103
103 -
 104
104 -
 105
105 -
 106
106 -
 107
107 -
108
-
109
-
110
-
111
-
112
-
113
-
114
-
115
-
116
-
117
-
118
-
119
-
120
-
121
-
122
-
123
-
124
-
125
-
126
-
127
-
128
-
129
-
130
-
131
-
132
-
133
-
134
-
135
-
136
-
137
-
138
-
139
-
140
-
141
-
142
-
143
-
144
-
145
-
146
-
147
-
148
-
149
-
150
-
151
-
152
-
153
-
154
-
155
-
156
-
157
 |
 |
