MSI 975X PLATINUM User Guide - Page 119
Installing the RAID Driver For bootable RAID array
 |
UPC - 816909035759
View all MSI 975X PLATINUM manuals
Add to My Manuals
Save this manual to your list of manuals |
Page 119 highlights
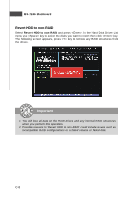
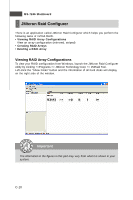
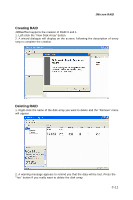
JMicron RAID Installing the RAID Driver (For bootable RAID array) Install Driver in Windows XP / 2000 † New Windows XP / 2000 Installation The following details the installation of the drivers while installing W indows XP / 2000. 1. Start the installation: Boot from the CD-ROM. Press F6 when the message "Press F6 if you need to install third party SCSI or RAID driver" appears. 2. W hen the W indows XP/2000 Setup window is generated, press key to specify an Additional Device(s). 3. Insert the driver diskette JMicron RAID Driver For Win2K/XP driver into drive A: and press . Important The Silicon Image JMicron RAID Driver Installation Disk should be accompanied in the mainboard package. You may make the Serial ATA RAID driver by yourself by following the instruction below. 1. Insert the MSI CD into the CD-ROM drive. 2. Click the "Browse CD" botton on the Setup Screen. 3. Copy all the contents in the \\IDE \ JMicron \ Floppy to a formatted floppy disk. 4. The driver disk for JM icron RAID Controller is done. 4. Choose the driver JM icron RAID Controller that appears on W indows XP/2000 Setup screen, and press the key. 5. Press to continue with installation or if you need to specify any additional devices to be installed, do so at this time. Once all devices are specified, press to continue with installation. 6. From the W indows XP/2000 Setup screen, press the key. Setup will now load all device files and then continue the W indows XP/2000 installation. † Installing OS on RAID Drive 1. After setup examines your disks, it will copy files to W indows installation folders and restart the system. 2. The setup program will continue and finish the installation after restarting. 3. W ait until W indows XP/2000 finishes installing devices, regional settings, networking settings, components, and final set of tasks, then reboot the system if necessary. † Confirming Windows XP/2000 Driver Installation 1. From W indows XP/2000, open the Control Panel from My Computer followed by the System icon. 2. Choose the Hardware tab, then click the Device M anager tab. 3. Click the "+" in front of the SCSI and RAID Controllers hardware type. The driver should appear. C-9
-
 1
1 -
2
-
3
-
4
-
5
-
6
-
7
-
8
-
9
-
10
-
11
-
12
-
13
-
14
-
15
-
16
-
17
-
18
-
19
-
20
-
21
-
22
-
23
-
24
-
25
-
26
-
27
-
28
-
29
-
30
-
31
-
32
-
33
-
34
-
35
-
36
-
37
-
38
-
39
-
40
-
41
-
42
-
43
-
44
-
45
-
46
-
47
-
48
-
49
-
50
-
51
-
52
-
53
-
54
-
55
-
56
-
57
-
58
-
59
-
60
-
61
-
62
-
63
-
64
-
65
-
66
-
67
-
68
-
69
-
70
-
71
-
72
-
73
-
74
-
75
-
76
-
77
-
78
-
79
-
80
-
81
-
82
-
83
-
84
-
85
-
86
-
87
-
88
-
89
-
90
-
91
-
92
-
93
-
94
-
95
-
96
-
97
-
98
-
99
-
100
-
101
-
102
-
103
-
104
-
105
-
106
-
107
-
108
-
109
-
110
-
111
-
112
-
113
-
 114
114 -
 115
115 -
 116
116 -
 117
117 -
 118
118 -
 119
119 -
 120
120 -
 121
121 -
 122
122 -
 123
123 -
 124
124 -
125
-
126
-
127
-
128
-
129
-
130
-
131
-
132
-
133
-
134
-
135
-
136
-
137
-
138
-
139
-
140
-
141
-
142
-
143
-
144
-
145
-
146
-
147
-
148
-
149
-
150
-
151
-
152
-
153
-
154
-
155
-
156
-
157
 |
 |