MSI B450M MORTAR MAX User Manual - Page 86
AMD RAID Configuration, Enabling RAIDXpert2 Configuration Utility
 |
View all MSI B450M MORTAR MAX manuals
Add to My Manuals
Save this manual to your list of manuals |
Page 86 highlights
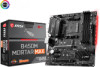
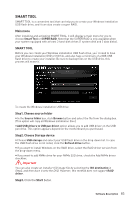
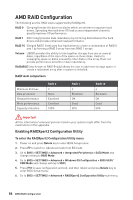
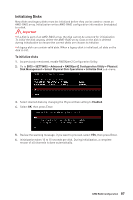
AMD RAID Configuration The following are the RAID levels supported by RAIDXpert2. RAID 0 (Striping) breaks the data into blocks which are written to separate hard drives. Spreading the hard drive I/O load across independent channels greatly improves I/O performance. RAID 1 (Mirroring) provides data redundancy by mirroring data between the hard drives and provides enhanced read performance. RAID 10 (Striped RAID1 Sets) uses four hard drives to create a combination of RAID 0 and 1 by forming a RAID 0 array from two RAID 1 arrays. Volume (JBOD) provides the ability to link-together storage from one or several disks, regardless of the size of the space on those disks. Useful in scavenging space on disks unused by other disks in the array. Does not provide performance benefits or data redundancy. RAIDABLE (also known as RAID Ready) allows the user to add more storage space or create a redundant array after a system is installed. RAID level comparison Minimum # drives Data protection Read performance Write performance Capacity utilization RAID 0 2 None Excellent Excellent 100% RAID 1 2 Excellent OK Good 50% RAID 10 4 Excellent OK Good 50% Important All the information/ volumes/ pictures listed in your system might differ from the illustrations in this appendix. Enabling RAIDXpert2 Configuration Utility To enter the RAIDXpert2 Configuration Utility menu 1. Power on and press Delete key to enter BIOS Setup menu. 2. Press F7 to switch to Advanced mode from EZ mode. 3. Go to BIOS > SETTINGS > Advanced > Integrated Peripherals > SATA Mode and change setting to RAID Mode. 4. Go to BIOS > SETTINGS > Advanced > Windows OS Configuration > BIOS UEFI/ CSM Mode and change setting to UEFI. 5. Press F10 to save configuration and exit, and then reboot and press Delete key to enter BIOS Setup menu. 6. Go to BIOS > SETTINGS > Advanced > RAIDXpert2 Configuration Utility sub-menu. 86 AMD RAID Configuration
-
 1
1 -
2
-
3
-
4
-
5
-
6
-
7
-
8
-
9
-
10
-
11
-
12
-
13
-
14
-
15
-
16
-
17
-
18
-
19
-
20
-
21
-
22
-
23
-
24
-
25
-
26
-
27
-
28
-
29
-
30
-
31
-
32
-
33
-
34
-
35
-
36
-
37
-
38
-
39
-
40
-
41
-
42
-
43
-
44
-
45
-
46
-
47
-
48
-
49
-
50
-
51
-
52
-
53
-
54
-
55
-
56
-
57
-
58
-
59
-
60
-
61
-
62
-
63
-
64
-
65
-
66
-
67
-
68
-
69
-
70
-
71
-
72
-
73
-
74
-
75
-
76
-
77
-
78
-
79
-
80
-
 81
81 -
 82
82 -
 83
83 -
 84
84 -
 85
85 -
 86
86 -
 87
87 -
 88
88 -
 89
89 -
 90
90 -
 91
91 -
92
-
93
-
94
-
95
 |
 |