MSI GE60 User Manual - Page 42
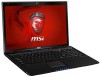
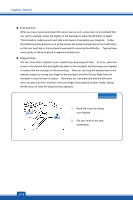
Inserting the Disk, Slightly press the center of the disk
 |
View all MSI GE60 manuals
Add to My Manuals
Save this manual to your list of manuals |
Page 42 highlights
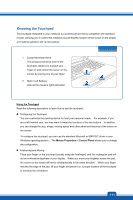
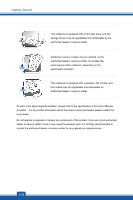
Getting Started Inserting the Disk 1. Confirm that the notebook is turned on. 2. Touch the EJECT quick launch button nearby the keyboard and the disk tray will slide out partially. Note that the ODD EJECT button is functional under pure DOS system. However, in an Operating System without the S-Bar application installed, the EJECT button will not be functional. In such a case, users can right-click the ODD in "My Computer" and select "Eject" to eject the ODD tray. 3. Gently pull the tray out until fully extended. 4. Place your disk in the tray with its label facing up. Slightly press the center of the disk to secure it into place. 5. Push the tray back into the drive. 3-18 1. Confirm that the disk is placed correctly and securely in the tray before closing the tray. 2. Do not leave the disk tray open. 3. Device shown here is for reference only.
-
 1
1 -
2
-
3
-
4
-
5
-
6
-
7
-
8
-
9
-
10
-
11
-
12
-
13
-
14
-
15
-
16
-
17
-
18
-
19
-
20
-
21
-
22
-
23
-
24
-
25
-
26
-
27
-
28
-
29
-
30
-
31
-
32
-
33
-
34
-
35
-
36
-
 37
37 -
 38
38 -
 39
39 -
 40
40 -
 41
41 -
 42
42 -
 43
43 -
 44
44 -
 45
45 -
 46
46 -
 47
47 -
48
-
49
 |
 |