MSI K8N NEO2 PLATINUM User Guide - Page 93
NVIDIA RAID Utility Installation - drivers xp
 |
UPC - 816909006148
View all MSI K8N NEO2 PLATINUM manuals
Add to My Manuals
Save this manual to your list of manuals |
Page 93 highlights
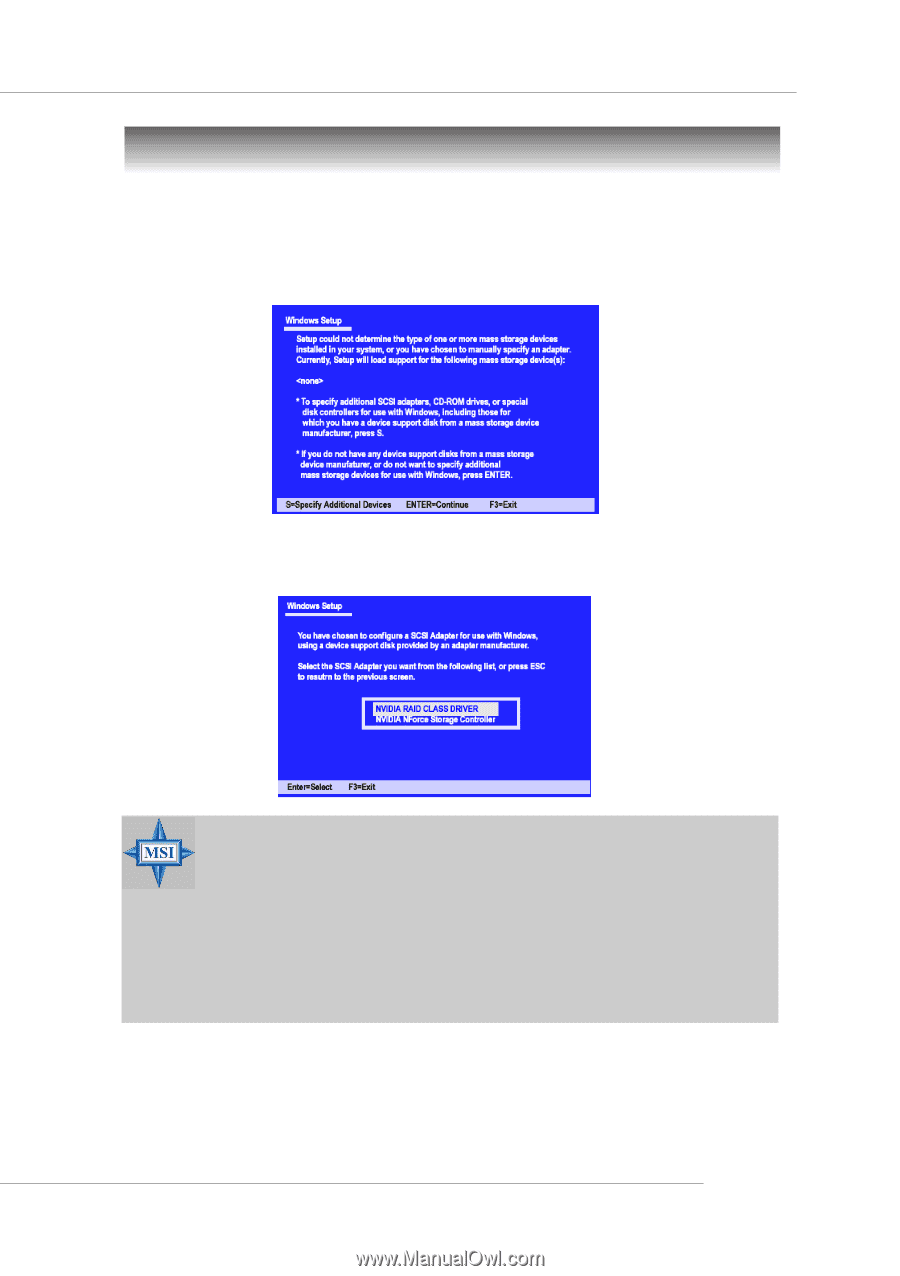
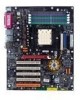
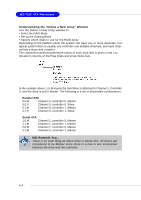
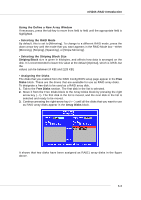
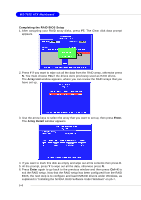
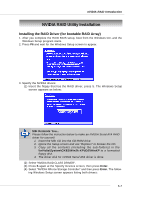
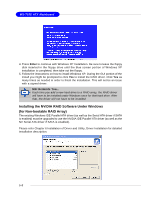
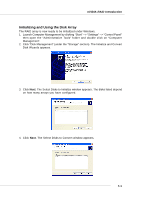
nVIDIA RAID Introduction NVIDIA RAID Utility Installation Installing the RAID Driver (for bootable RAID Array) 1. After you complete the RAID BIOS setup, boot from the Windows CD, and the Windows Setup program starts. 2. Press F6 and wait for the Windows Setup screen to appear. 3. Specify the NVIDIA drivers: (1) Insert the floppy that has the RAID driver, press S. The Windows Setup screen appears as below: MSI Reminds You... Please follow the instruction below to make an NVIDIA Serial ATA RAID driver for yourself. 1. Insert the MSI CD into the CD-ROM drive. 2. Ignore the Setup screen and use "Explorer" to browse the CD. 3. Copy all the contents (including the sub-folders) in the \\nVidia\System\CK8S\Win2k-XP\IDE\WinXP to a formatted floppy disk. 4. The driver disk for nVIDIA Serial ATA driver is done. (2) Select "NVIDIA RAID CLASS DRIVER". (3) Press S again at the Specify Devices screen, then press Enter. (4) Select "NVIDIA NForce Storage Controller" and then press Enter. The following Windows Setup screen appears listing both drivers: 5-7
-
 1
1 -
2
-
3
-
4
-
5
-
6
-
7
-
8
-
9
-
10
-
11
-
12
-
13
-
14
-
15
-
16
-
17
-
18
-
19
-
20
-
21
-
22
-
23
-
24
-
25
-
26
-
27
-
28
-
29
-
30
-
31
-
32
-
33
-
34
-
35
-
36
-
37
-
38
-
39
-
40
-
41
-
42
-
43
-
44
-
45
-
46
-
47
-
48
-
49
-
50
-
51
-
52
-
53
-
54
-
55
-
56
-
57
-
58
-
59
-
60
-
61
-
62
-
63
-
64
-
65
-
66
-
67
-
68
-
69
-
70
-
71
-
72
-
73
-
74
-
75
-
76
-
77
-
78
-
79
-
80
-
81
-
82
-
83
-
84
-
85
-
86
-
87
-
 88
88 -
 89
89 -
 90
90 -
 91
91 -
 92
92 -
 93
93 -
 94
94 -
 95
95 -
 96
96 -
 97
97 -
 98
98 -
99
-
100
-
101
-
102
-
103
-
104
-
105
-
106
-
107
-
108
-
109
-
110
-
111
-
112
-
113
 |
 |