MSI PX8 NEO-V User Guide - Page 16
Installing the CPU Fan - a motherboard
 |
View all MSI PX8 NEO-V manuals
Add to My Manuals
Save this manual to your list of manuals |
Page 16 highlights
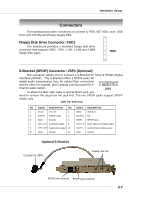
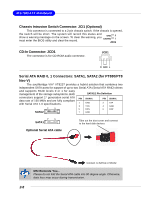
MS-7043 ATX Mainboard Installing the CPU Fan As processor technology pushes to faster speeds and higher performance, thermal management becomes increasingly important. To dissipate heat, you need to attach the CPU cooling fan and heatsink on top of the CPU. Follow the instructions below to install the Heatsink/Fan: 1. Locate the CPU and its retention mechanism on the motherboard. retention mechanism 2. Position the heatsink onto the retention mechanism. 3. Mount the fan on top of the heatsink. Press down the fan until its four clips get wedged in the holes of the retention mechanism. 4. Press the two levers down to fasten the fan. Each lever can be pressed down in only ONE direction. levers 5. Connect the fan power cable from the mounted fan to the 3-pin fan power connector on the board. fan power cable 2-4
-
 1
1 -
2
-
3
-
4
-
5
-
6
-
7
-
8
-
9
-
10
-
 11
11 -
 12
12 -
 13
13 -
 14
14 -
 15
15 -
 16
16 -
 17
17 -
 18
18 -
 19
19 -
 20
20 -
 21
21 -
22
-
23
-
24
-
25
-
26
-
27
-
28
-
29
-
30
 |
 |
