MSI Z370 PC PRO User Manual - Page 83
RAID Configuration, Using Intel® Rapid Storage Technology Option ROM, Using Intel
 |
View all MSI Z370 PC PRO manuals
Add to My Manuals
Save this manual to your list of manuals |
Page 83 highlights
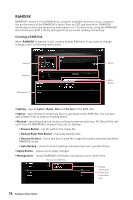
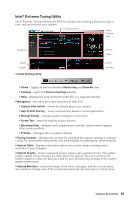
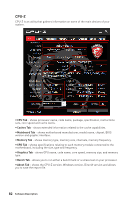
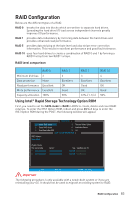
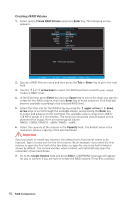
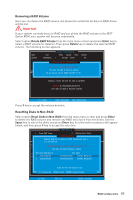
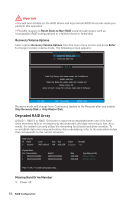
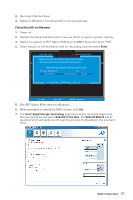
RAID Configuration Below are the different types of a RAID. RAID 0 breaks the data into blocks which are written to separate hard drives. Spreading the hard drive I/O load across independent channels greatly improves I/O performance. RAID 1 provides data redundancy by mirroring data between the hard drives and provides enhanced read performance. RAID 5 provides data striping at the byte level and also stripe error correction information. This results in excellent performance and good fault tolerance. RAID 10 uses four hard drives to create a combination of RAID 0 and 1 by forming a RAID 0 array from two RAID 1 arrays. RAID level comparison RAID 0 RAID 1 RAID 5 RAID 10 Minimum # drives 2 Data protection None Read performance Excellent Write performance Excellent Capacity utilization 100% 2 Excellent OK Good 50% 3 Excellent Good OK 67%~(1-1/n) 4 Excellent OK Good 50% Using Intel® Rapid Storage Technology Option ROM First, you need to set the SATA mode to RAID in BIOS to create, delete and reset RAID volumes. To enter the IRST Option ROM, reboot and press Ctrl + I keys to enter the IRST Option ROM during the POST, the following window will appear. [ [ MMAAININMMEENNUU ]] 1. Create RAID Volume 4. Recovery Volume Options 2. Delete RAID Volume 5. Acceleration Options 3. Reset Disks to Non-RAID 6. Exit [ DISK / VOLUME INFORMATION ] RAID Volumes : None defined. Physical Devices : Port Device Model 1 XXXX-XXXXXXXX 2 XXXX-XXXXXXXX Serial # XXXXXXXXXXXXXX XXXXXXXXXXXXXX Size Type/Status (Vol ID) XXX.XGB Non-RAID Disk XXX.XGB Non-RAID Disk [ ↑↓] - Select [ESC] - Exit [ENTER] - Select Menu Important The following procedure is only available with a newly-built system or if you are reinstalling your OS. It should not be used to migrate an existing system to RAID. RAID Configuration 83
-
 1
1 -
2
-
3
-
4
-
5
-
6
-
7
-
8
-
9
-
10
-
11
-
12
-
13
-
14
-
15
-
16
-
17
-
18
-
19
-
20
-
21
-
22
-
23
-
24
-
25
-
26
-
27
-
28
-
29
-
30
-
31
-
32
-
33
-
34
-
35
-
36
-
37
-
38
-
39
-
40
-
41
-
42
-
43
-
44
-
45
-
46
-
47
-
48
-
49
-
50
-
51
-
52
-
53
-
54
-
55
-
56
-
57
-
58
-
59
-
60
-
61
-
62
-
63
-
64
-
65
-
66
-
67
-
68
-
69
-
70
-
71
-
72
-
73
-
74
-
75
-
76
-
77
-
 78
78 -
 79
79 -
 80
80 -
 81
81 -
 82
82 -
 83
83 -
 84
84 -
 85
85 -
 86
86 -
 87
87 -
 88
88 -
89
-
90
-
91
-
92
-
93
-
94
-
95
-
96
-
97
-
98
-
99
 |
 |
