Mackie 406M Owner's Manual - Page 6
Read This Quick Start - manual
 |
View all Mackie 406M manuals
Add to My Manuals
Save this manual to your list of manuals |
Page 6 highlights
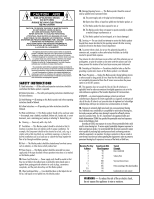
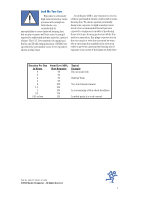
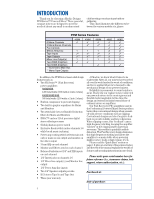
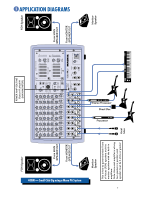
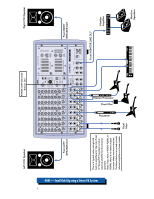
READ THIS PAGE! QUICK START We know you can't wait to get your new mixer set up and working. Who has time to read the manual? But please, take a moment to read through this section at least to get the bare essentials. The Mackie Designs powered mixers are designed to set up and operate quickly and easily. Just follow these simple directions. Setup Place the powered mixer in a position where it is easy to reach the controls. All the controls and input connection points are located on the front panel so you can make quick adjustments and connections onstage. Make sure there is at least 6 inches of airspace behind the powered mixer for ventilation. There is no fan built into the Mackie PPM Series. It relies on convection cooling, which means the heatsink on the back is cooled by the natural flow of air through the heatsink fins. Connections 1. Be sure the POWER switch on the back is OFF before making any connections. 2. Plug a balanced microphone into one of the MIC XLR (3-pin) connectors on the front panel. Or you can connect any linelevel signal (keyboard, guitar preamp, DI box) to the LINE jack using a TS or a TRS 1/4" plug. 3. The INSERT jacks are used to connect an external effects or dynamics processor into the signal chain. See page 21 for more info. 4. Plug the speakers (2 ohms or greater) into the SPEAKER OUT jacks on the rear panel. If you plug two speakers into a side, each speaker must be 4 ohms or greater to maintain a 2-ohm minimum load on the amplifier. Use at least 18 gauge speaker cable with 1/4" TS plugs. Don't use guitar cords for speaker cables! They're not designed to handle speaker-level signals and could overheat. 6 Level Setting 1. Turn down the channel MON, EFX, INPUT LEVEL SET, and VOLUME knobs (fully counterclockwise). Set all the EQ controls to center, including the graphic EQ sliders. Turn down the MAIN MASTER and MONITOR MASTER controls. 2. If your microphone is a condenser mic, push in the PHANTOM POWER switch. If you are using both condenser and dynamic mics, don't worry. Phantom power will not hurt most dynamic mics. Check the microphone's user manual if you're not sure. 3. Leave the POWER AMP ROUTING switch in the OUT position (MAIN/MAIN or STEREO MAINS). 4. Push the linecord securely into the IEC connector on the rear panel, and plug it into a 3-prong AC outlet properly configured for the type of plug supplied with your powered mixer. Turn on the POWER switch, which is located on the rear panel. 5. Play something into the selected input. This could be an instrument, a singing or speaking voice, or a line input such as a CD player or tape recorder output. Be sure that the volume of the input signal is the same as it would be during normal use. If it isn't, you might have to readjust these levels during the middle of the set. 6. Turn up the INPUT LEVEL SET control until the LED next to it begins to blink. 7. Turn up the channel VOLUME control to unity (center). 8. Slowly turn up the MAIN MASTER control until you can hear the signal in the speakers. 9. Repeat steps 5, 6, and 7 for the remaining channels. 10. Now you're ready to rock and roll! Things You Must Remember: • Never plug amplifier outputs into anything except speakers (unless you have an outboard box specifically designed to handle high-power speakerlevel signals). • Before making connections to an external amp or reconfiguring an amp's routing, turn the amp's level (gain) controls down, turn the power off, make the changes, turn the power back on, and then turn the level controls back up. • When you shut down your equipment, turn off any external amplifiers first. When powering up, turn on the amplifiers last. • Save the shipping box and packing material! You may need them someday, and you probably don't want to have to pay for them again.
-
 1
1 -
 2
2 -
 3
3 -
 4
4 -
 5
5 -
 6
6 -
 7
7 -
 8
8 -
 9
9 -
 10
10 -
 11
11 -
 12
12 -
13
-
14
-
15
-
16
-
17
-
18
-
19
-
20
-
21
-
22
-
23
-
24
-
25
-
26
-
27
-
28
-
29
-
30
-
31
-
32
-
33
-
34
-
35
-
36
 |
 |
