Mackie 408M Owner's Manual - Page 18
Time/rate Parameter, Damping/depth Parameter, Master Output Description, Power Led
 |
View all Mackie 408M manuals
Add to My Manuals
Save this manual to your list of manuals |
Page 18 highlights
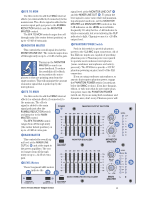
TIME/RATE PARAMETER MAIN EQUALIZER If you have a reverb effect selected, this control adjusts how long the reverberation lasts, with 0 being a short reverb time and 10 being the longest. If you have a delay effect selected, this adjusts the amount of time between the original signal and the delayed signal, with 0 being a short delay time and 10 being the longest delay time. If you have a chorus, flange, or phaser effect selected, this control adjusts the rate or speed of the modulation of the effect. DAMPING/DEPTH PARAMETER If you have a reverb or delay effect selected, this control adjusts how fast the higher frequencies roll off in the reverberation or delay, with 0 having no roll off and 10 having the most roll off. If you have a chorus, flange, or phaser effect selected, this control adjusts the depth of the modulation of the effect. PARAMETERS NORMAL NORMAL 0 10 TIME RATE REVERBS DELAYS CHORUS FLANGE PHASER 0 10 DAMPING DEPTH The MAIN EQUALIZER is used to shape the overall frequency response for the main speakers. The equalizer is the last thing in the chain prior to the signal being routed to the power amplifiers and the MIXER LINE OUT. How to Adjust the Graphic Equalizers: Note: These instructions are written on the top of the PPM Series cabinet, but we'll repeat them here because they are so important. Reducing Feedback (Do monitor first) 1. Set the MIC channels to working volume levels (see "Level Setting" on page 6). 2. Set the Graphic EQ sliders to zero (center). 3. Slowly turn up the MAIN MASTER volume until feedback just begins to occur. BE CAREFUL! Feedback can occur quickly and become very LOUD, very fast. 4. Cut the appropriate slider until feedback stops. Suggestions for Better Sound 1. For better vocal sound, set the 125, 250, and 16K sliders to +5. Note: Make sure the singer is within 3 to 6 inches of the microphone. No amount of EQ can save a vocal when the singer is too far away from the microphone. 2. For more presence, set the 4K and 8K sliders to +5. 3. To warm up the overall sound, set the 2K slider to -5. 4. Use the RUMBLE REDUCTION switch to reduce the noise floor. 5. REMEMBER, LESS IS BETTER. MASTER OUTPUT SECTION Description POWER LED This indicator lights up whenever the POWER switch is turned on and the PPM Series is plugged into a live outlet, just to let you know you're ready for action. MONITOR EQUALIZER The MONITOR EQUALIZER is used to shape the overall frequency response for the monitor speakers on stage. This is called a graphic equalizer because the position of the sliders provides a graphic display of the frequency response at its output. The equalizer is the last thing in the signal chain prior to being routed to the MONITOR LINE OUT (and the power amplifier if the POWER AMP ROUTING switch is pushed in). 75Hz RUMBLE REDUCTION There are two of these switches; one for the monitor output and one for the main output. Pushing in this switch places a low-cut filter into the circuit path, rolling off the frequencies below 75Hz. Use the RUMBLE REDUCTION switch on the main output to reduce stage rumble (lowfrequency noise from footsteps picked up by microphones on stage) and microphonehandling noise. Use the RUMBLE REDUCTION switch on the monitor output to reduce the muddiness caused by the lows feeding back into the main output through the stage microphones. Note: This filter is separate from the graphic equalizer. The main RUMBLE REDUCTION switch affects only channels 1-6 and not the stereo channels 7 & 8, EFX TO MAIN, or TAPE IN. The monitor RUMBLE REDUCTION switch does affect the EFX TO MON signal. 18
-
 1
1 -
2
-
3
-
4
-
5
-
6
-
7
-
8
-
9
-
10
-
11
-
12
-
 13
13 -
 14
14 -
 15
15 -
 16
16 -
 17
17 -
 18
18 -
 19
19 -
 20
20 -
 21
21 -
 22
22 -
 23
23 -
24
-
25
-
26
-
27
-
28
-
29
-
30
-
31
-
32
-
33
-
34
-
35
-
36
 |
 |
